Customers
Everything starts with the customer: inquiries, offers, orders, assets and documents belong to a customer. Under “Customers” you create the customer once and then find everything about them on one page.
Owners, administrators, office staff and dispatchers can view, create, edit and archive customers. The warehouse and technicians do not see the “Customers” page (Users and roles). You find “Customers” in the left-hand menu in the “Master data” group.
Creating a customer
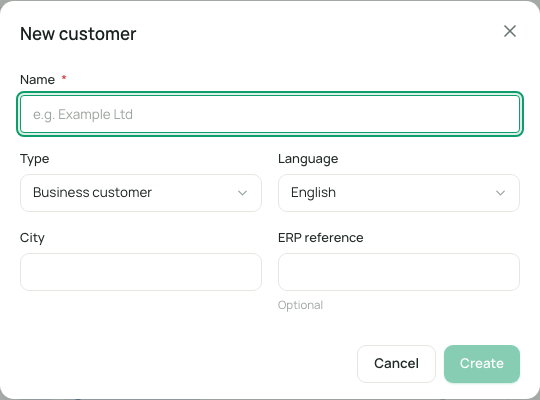
Section titled “Creating a customer”- Click “New customer” at the top right.
- Enter at least the “Name”, for example “Sample Ltd”. It needs at least 2 characters.
- Choose the “Type”: “Business customer” or “Private customer”.
- Choose the customer’s “Language”. The language in which you are currently working is preselected.
- If needed, enter the “City” and the “ERP reference”.
- Click “Create”. eelikField immediately opens the page of the new customer.
| Field | Meaning | Required |
|---|---|---|
| Name | Name of the customer or company. | Yes |
| Type | “Business customer” or “Private customer”. The list filters by it. | Yes |
| Language | Slovenščina, Deutsch, Bosanski or English. The customer sees the customer portal in this language (Language). | Yes |
| City | The customer’s city. It appears in the list and is also used for the region filters on the planning board. | No |
| ERP reference | The customer’s number in your accounting or merchandise management program, if you use one. It links the two worlds when you export. | No |
Every customer automatically gets a customer number according to your number range, for example KU-2026-001. You change how it is built under “Settings”, “Number ranges” (Company).
You do not enter address, phone and email on the customer itself, but on their locations and contact persons. That follows on the customer page.
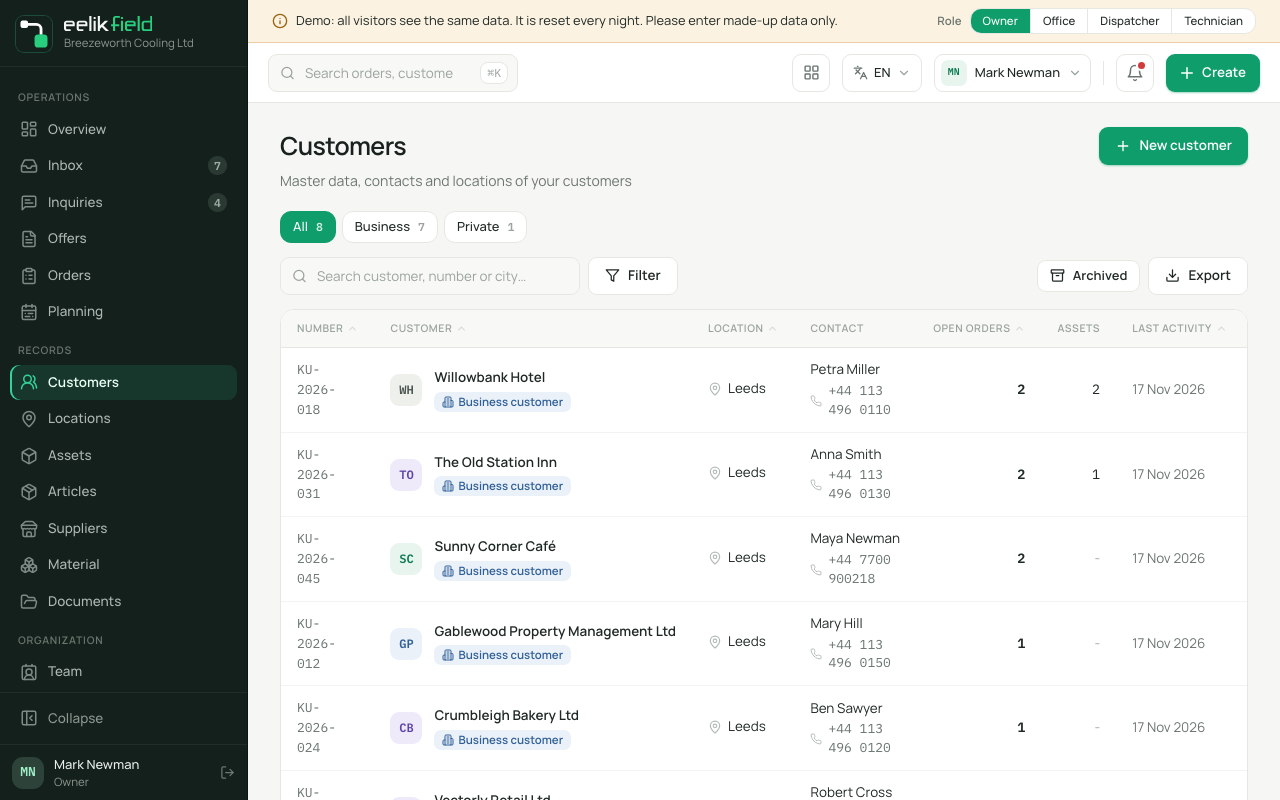
The customer list
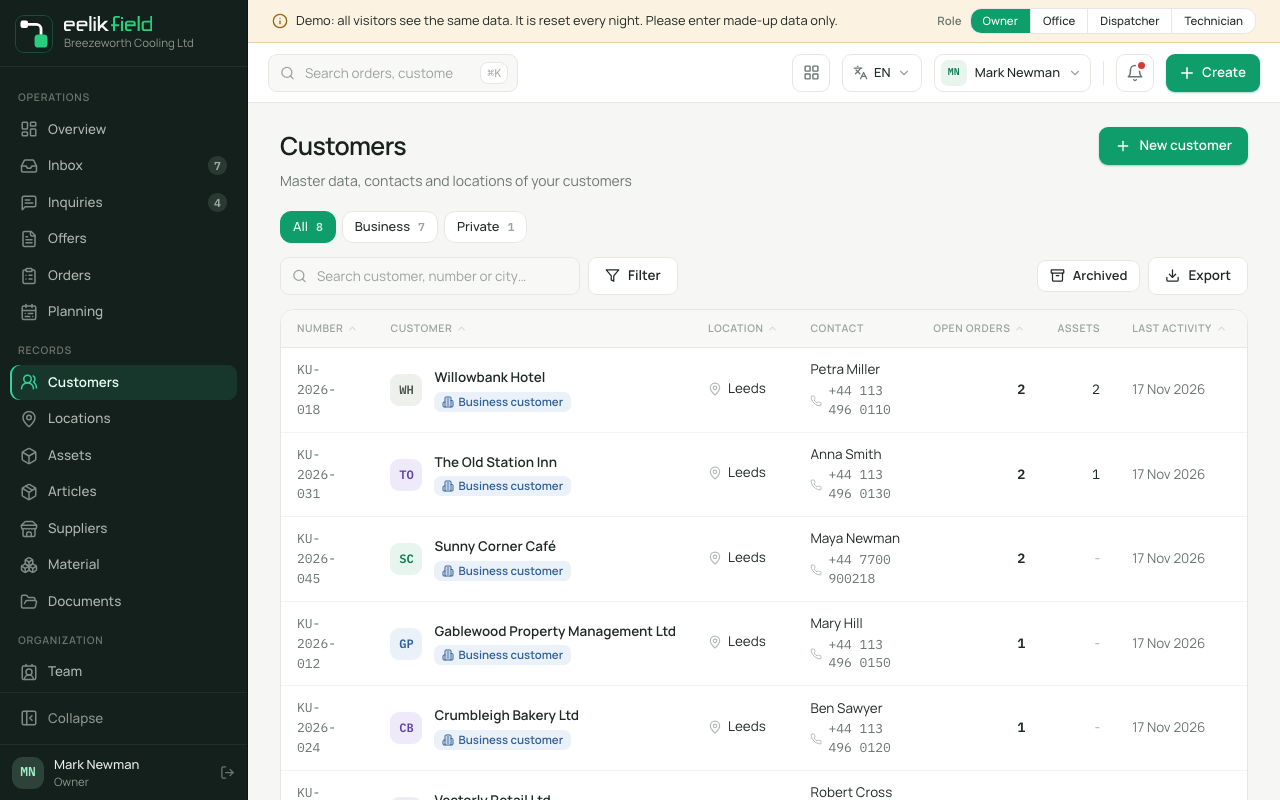
Section titled “The customer list”For each customer the list shows:
| Column | Content |
|---|---|
| Number | The customer number. |
| Customer | Name and type (business customer or private customer). |
| Location | The city. |
| Contact | The main contact with phone number. |
| Open orders | Number of orders that are not yet completed. |
| Assets | Number of recorded assets. |
| Last activity | Date of the last activity with the customer. |
| ERP | The ERP reference, if there is one. |
Searching and filtering
Section titled “Searching and filtering”- Search: The field “Search customer, number or city…” searches by name, customer number, city, ERP reference and the name of the first contact person.
- Views: The tabs “All”, “Business” and “Private” show only customers of that type.
- Filters: With “Filter” you switch on “Only with open orders” and “Only with ERP reference”. “Reset filter” removes them again.
- Columns and sorting: With “Columns” you choose the visible columns. A click on a column heading sorts the list.
- Pages: 50 customers are shown per page. Below, you page with “Next” and “Previous”.
- Archived: The list shows only active customers. With the “Archived” button on the right of the toolbar you see only the archived customers instead, each with the “Archived” badge. If there are no hits, it says “No archived entries.”
- Export: “Export as CSV” or “Export as Excel” downloads the list currently shown, with number, customer, type, city, contact, open orders, assets and ERP reference.
Search, view, filter and sorting are in the page’s address. If you save the address as a bookmark, you come back to exactly this view.
At the top of the bar you also find the general search “Search orders, customers, articles…”. With it you jump from any page straight to a customer.
The customer page
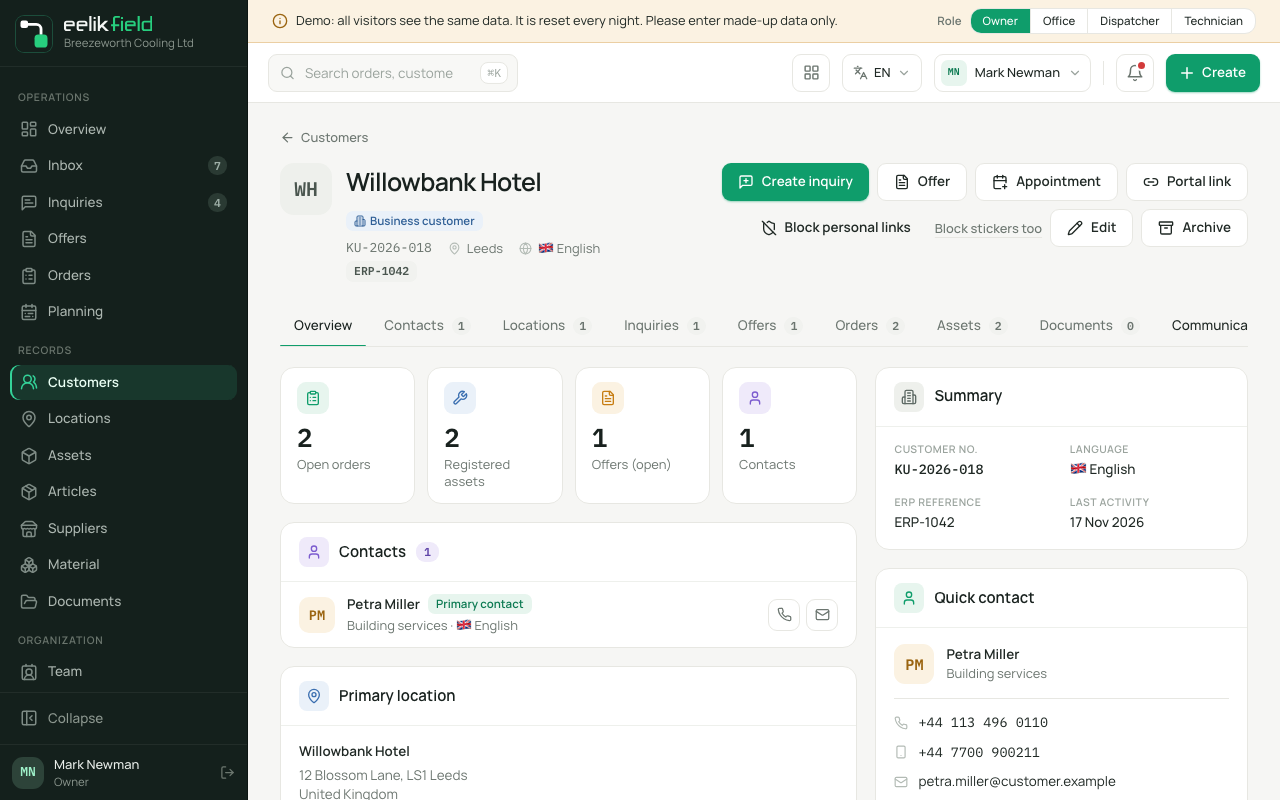
Section titled “The customer page”Click a row to open the customer’s page. At the top you see the name, type, customer number, city, language and, if there is one, the ERP reference. Next to it are the most important buttons:
| Button | What it does |
|---|---|
| “Create inquiry” | Creates an inquiry for this customer (Inquiries). |
| “Offer” | Opens the offer editor with this customer. |
| “Appointment” | Leads to the planning board. |
| “Portal link” | Creates the customer’s personal link to the customer portal and copies it. Then you see “Portal link copied” and “open”. Owners, administrators, office staff and dispatchers only. |
| “Block personal links” and “Block stickers too” | Block the portal links, or additionally the customer’s QR stickers (Customer portal). |
| “Edit” | Changes name, type, language, city and ERP reference. |
| “Archive” | Takes the customer out of the customer list and the selection lists (see below). For an archived customer, “Restore” appears instead. |
Below that there are ten tabs:
| Tab | Content |
|---|---|
| Overview | Key figures (“Open orders”, “Registered assets”, “Offers (open)”, “Contacts”), the contact persons, the “Primary location” with access, parking and notes, the summary with customer number, language, ERP link and last activity, and the “Quick contact”. |
| Contacts | All contact persons as cards. |
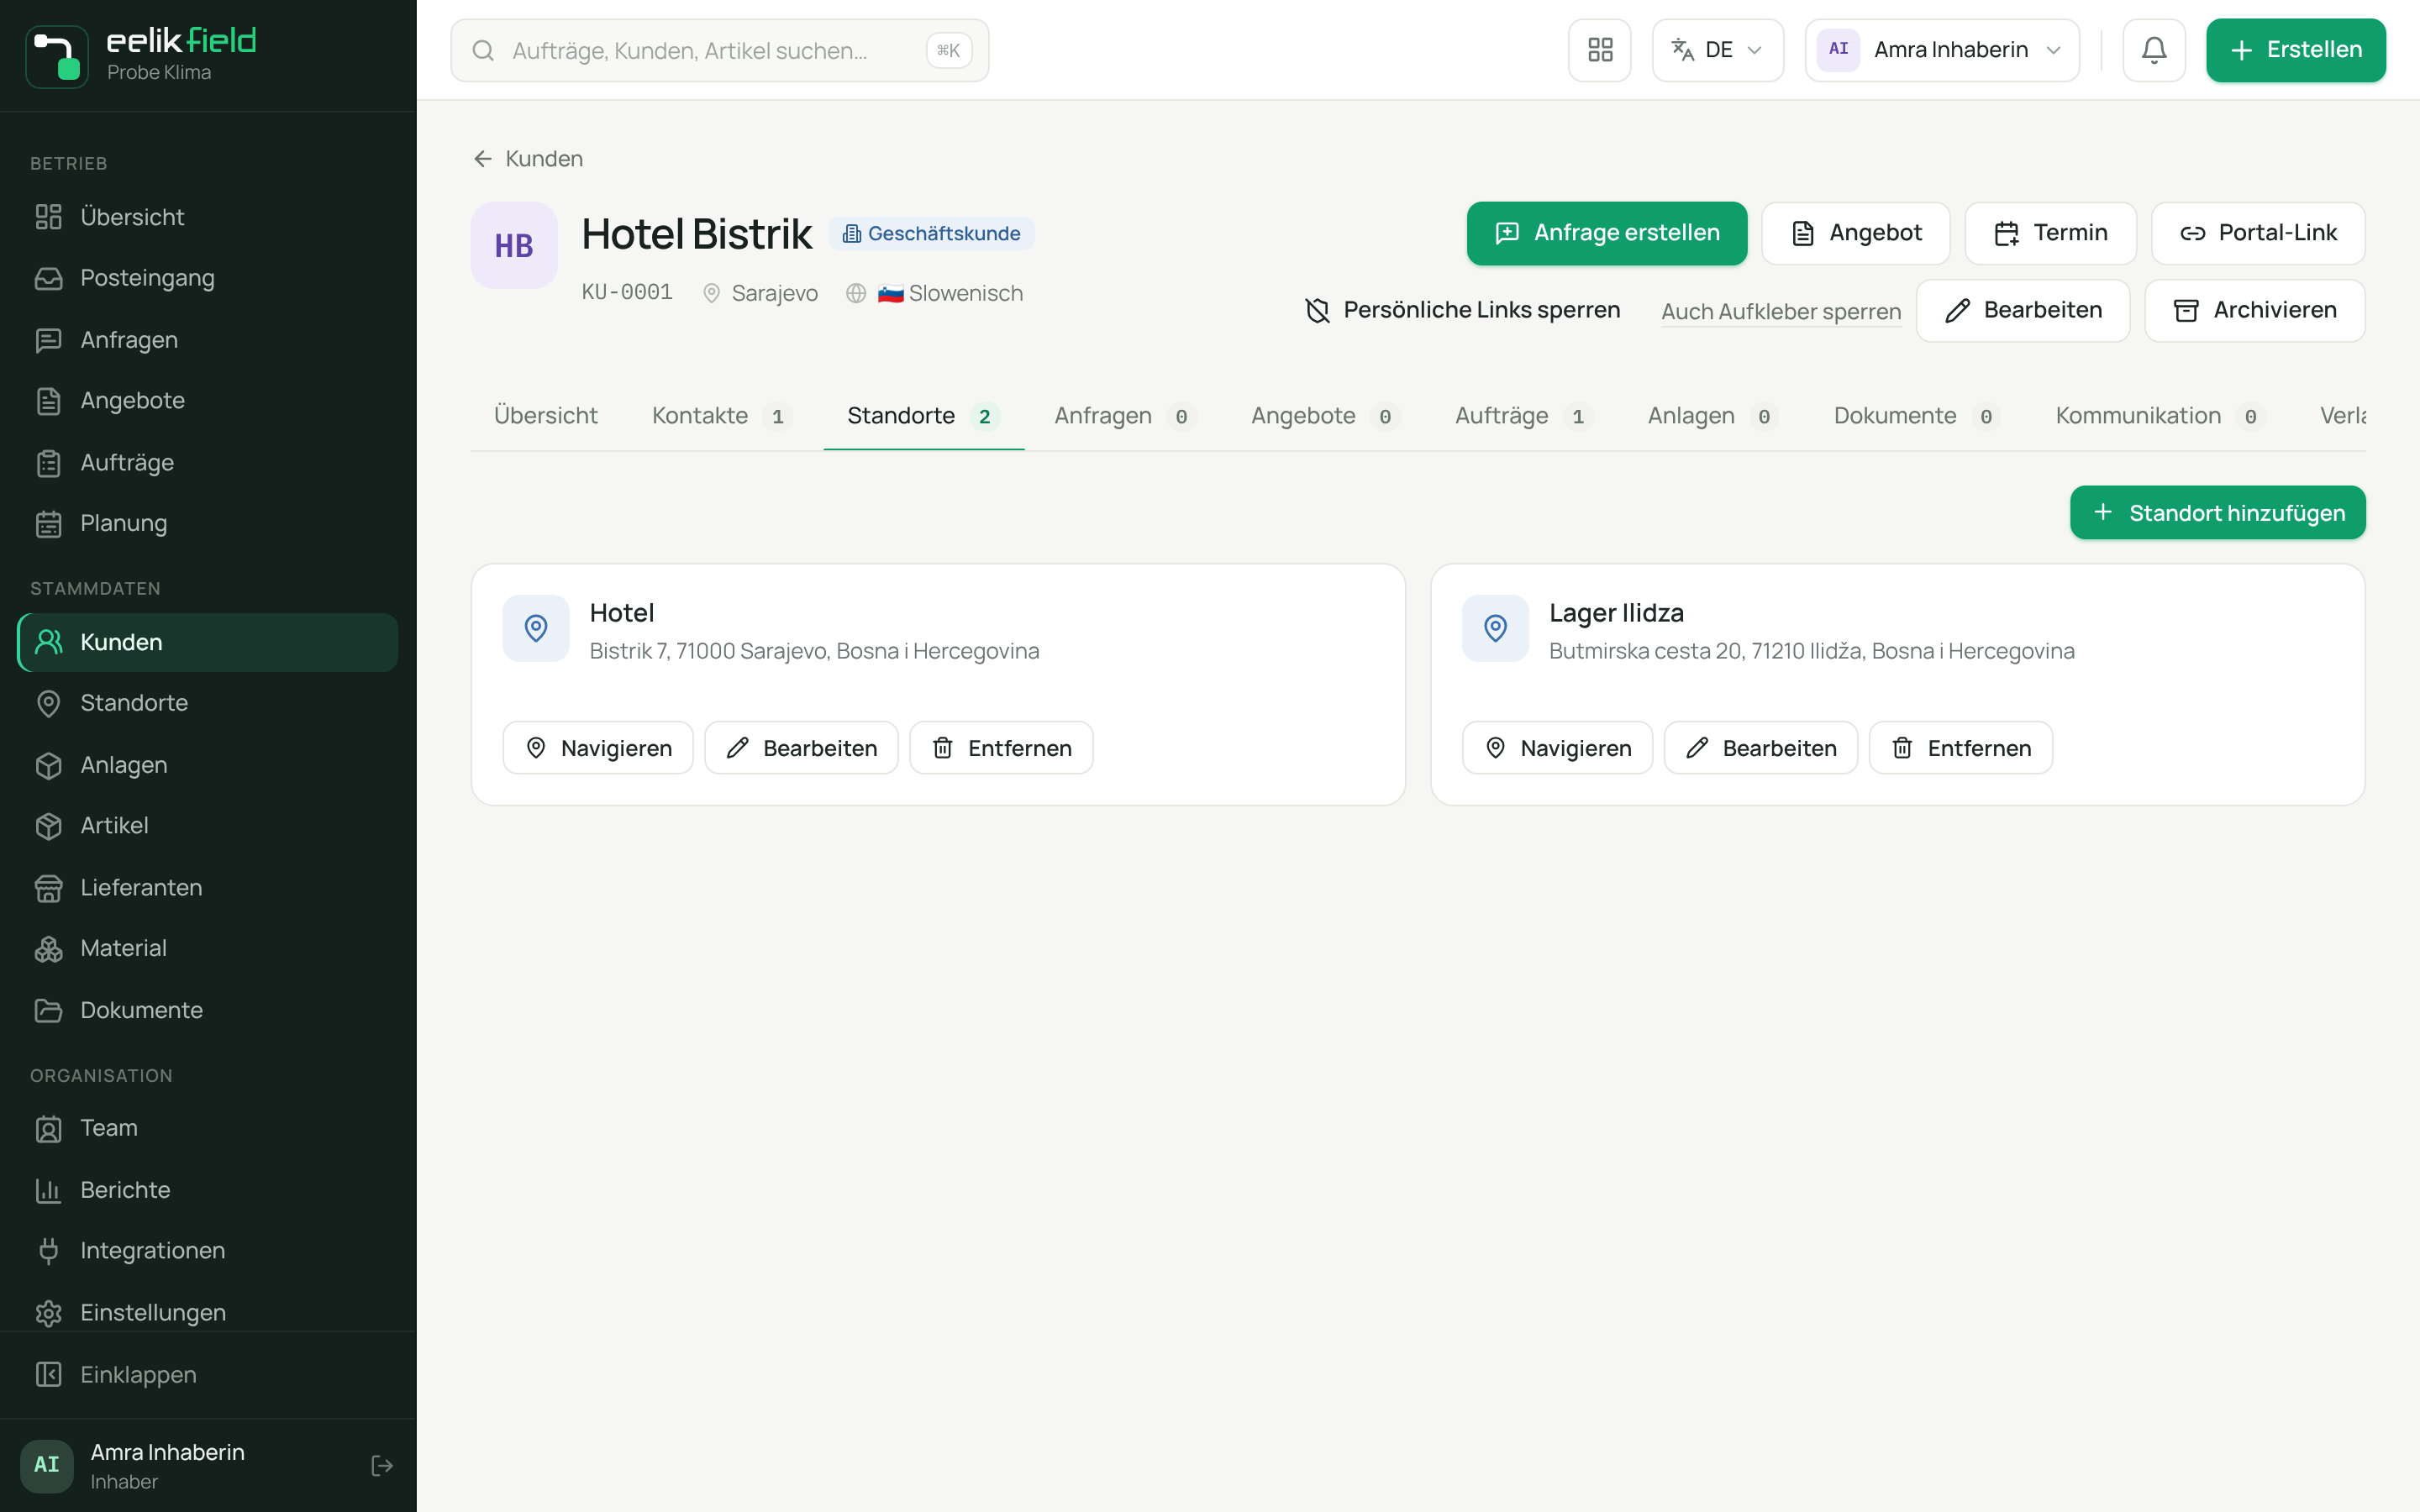
| Locations | All locations as cards. |
| Inquiries | All of the customer’s inquiries. |
| Offers | All offers with version, validity and amount. |
| Orders | All orders with status and amount. |
| Assets | All of the customer’s assets and the “PIN for QR stickers” (office roles only). |
| Documents | Documents, marked “Customer-visible” or “Internal”. |
| Communication | Messages and events with the customer. |
| History | The log of all changes to the customer. |
Editing a customer
Section titled “Editing a customer”- Click “Edit”. “Edit customer” opens.
- Change “Name”, “Type”, “Language”, “City” or “ERP reference”.
- Click “Save”.
Adding a contact person
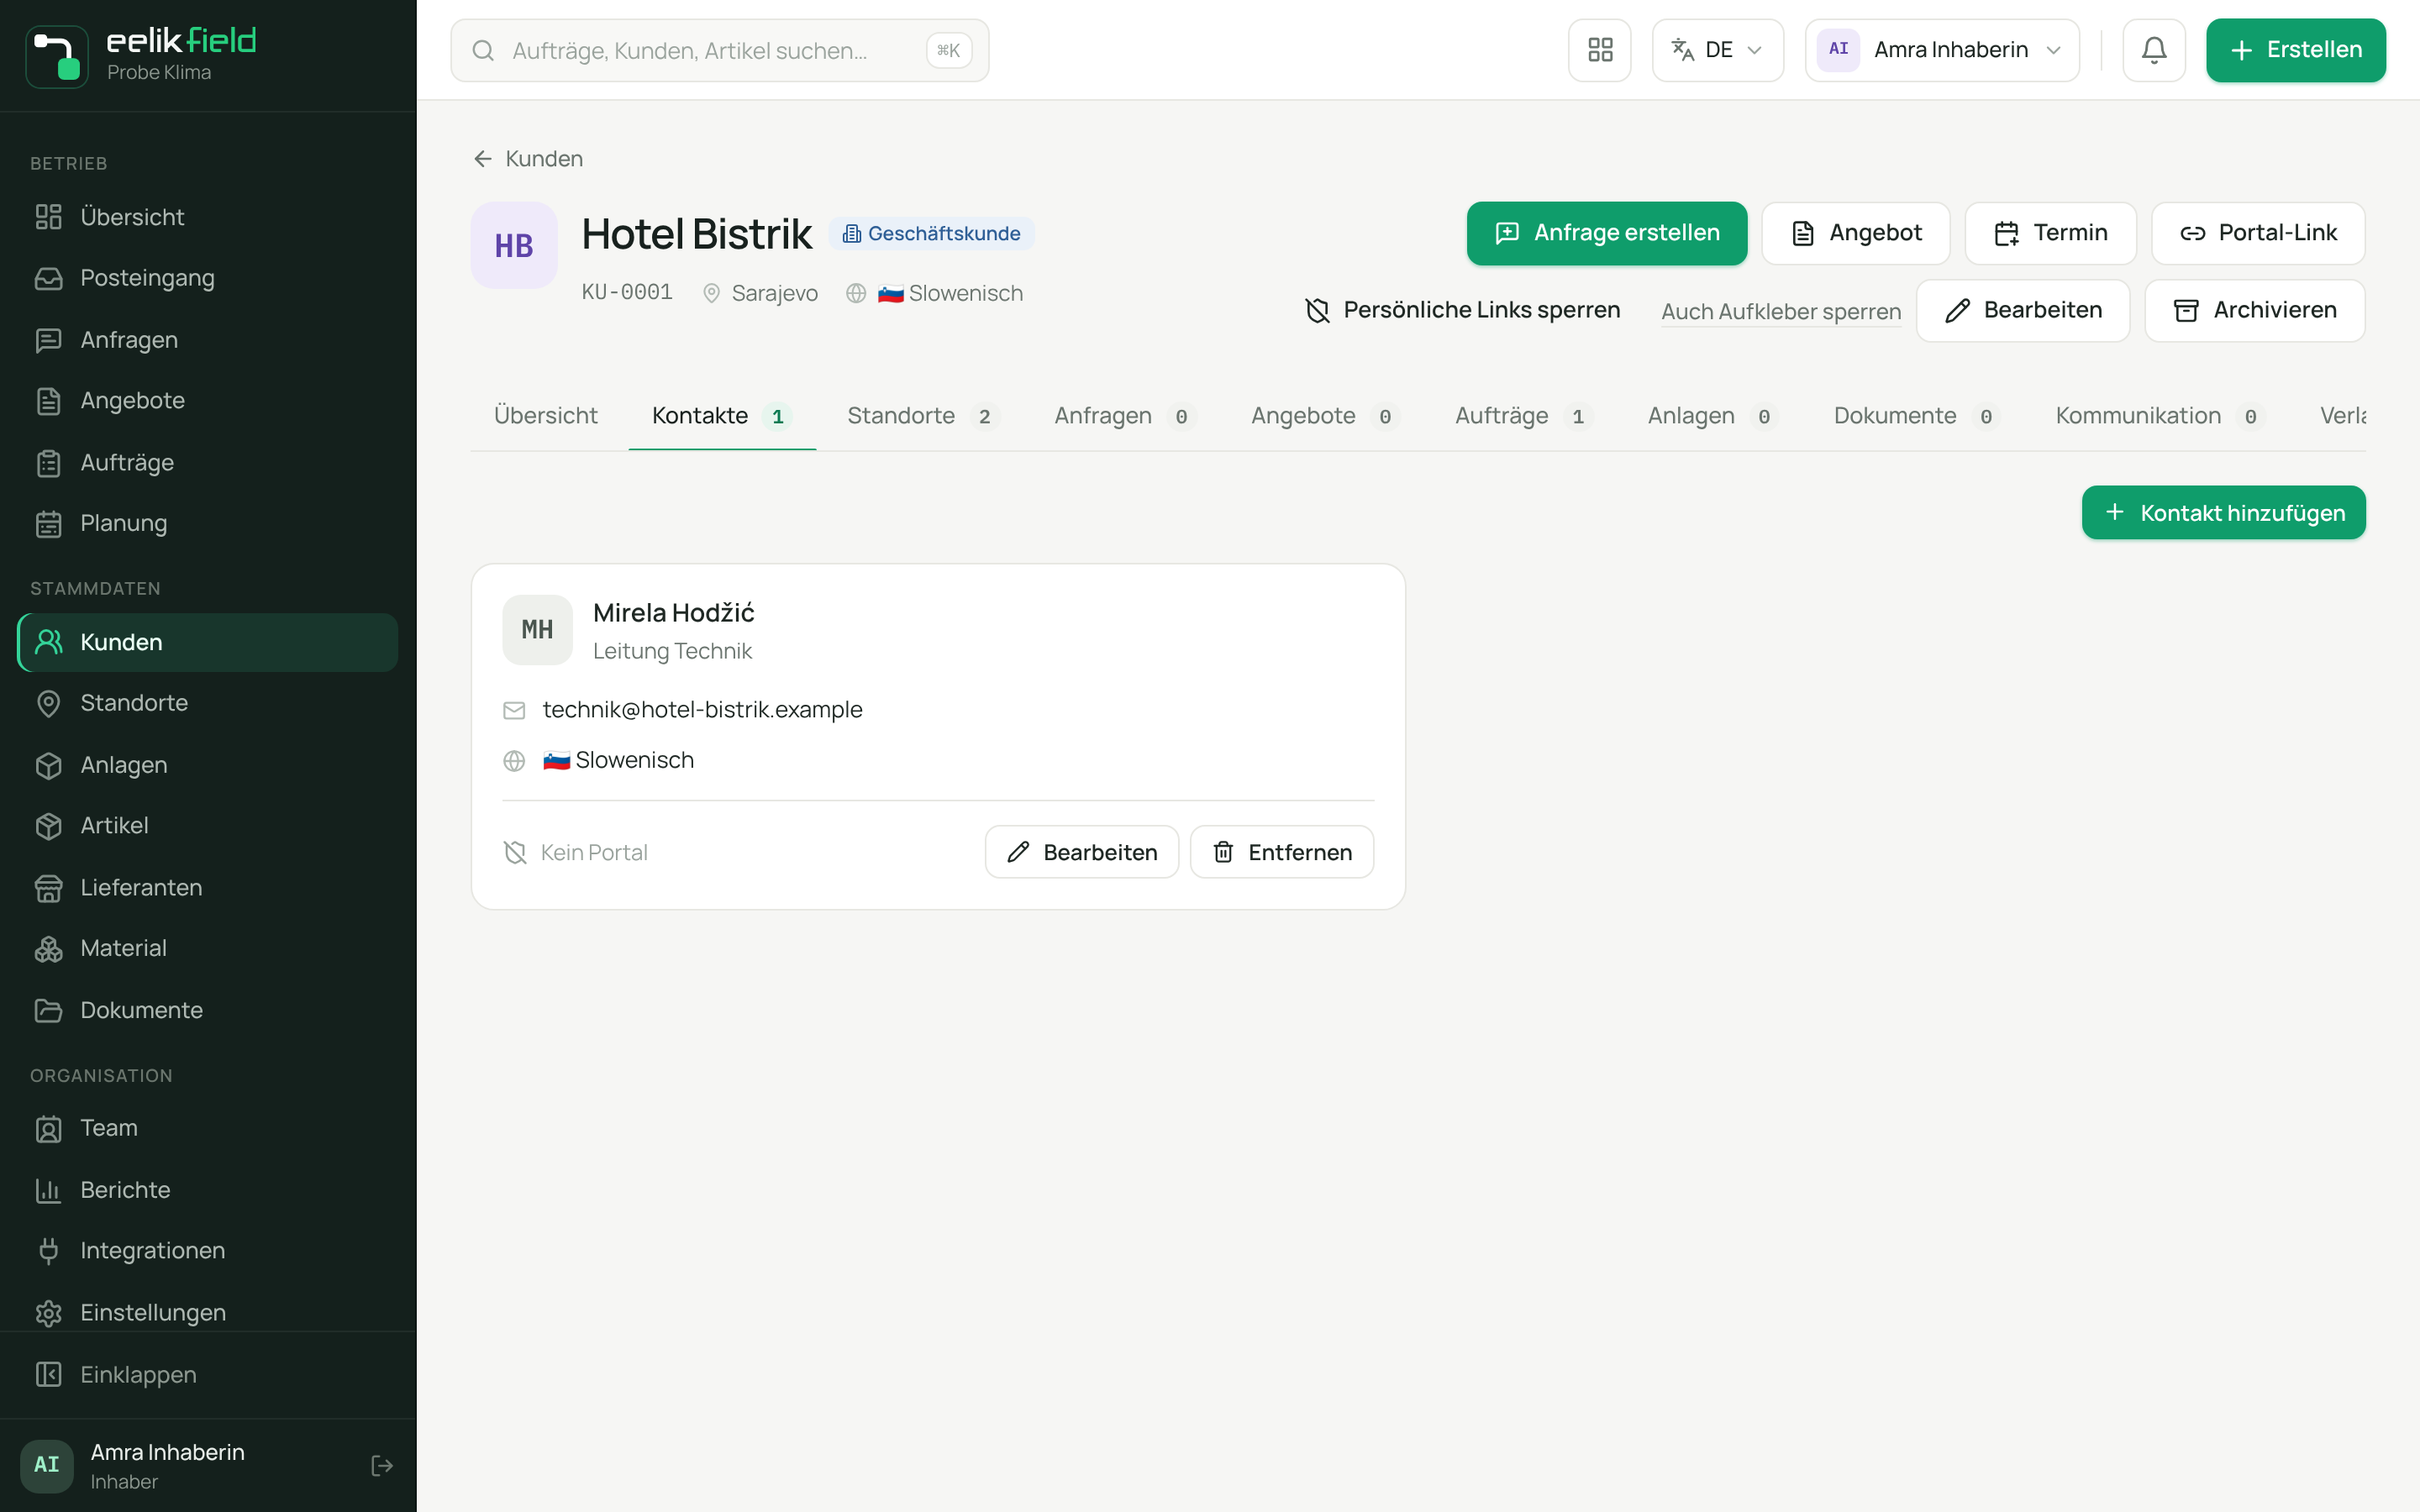
Section titled “Adding a contact person”Open the “Contacts” tab and click “Add contact”.
| Field | Meaning | Required |
|---|---|---|
| Name | Name of the person, at least 2 characters. | Yes |
| Role | For example “Plant manager”. | No |
| Phone, Mobile | Phone numbers. In the list and on the customer page they can be tapped. | No |
| The person’s email address. | No | |
| Language | The person’s language. | Yes |
| Set as primary contact | Makes the person the main contact. The previous main contact loses the marking. The main contact appears in the customer list and in the “Quick contact”. | No |
| Enable portal access | Marks the person as a contact with a customer portal. The card then says “Portal active”, otherwise “No portal”. | No |
Changing or removing a contact person
Section titled “Changing or removing a contact person”On each card in the “Contacts” tab there are the buttons “Edit” and “Remove” at the bottom.
- “Edit” opens “Edit contact” with the same fields as above. Change what is needed and click “Save”. If you make the person the main contact, the customer’s other contacts lose the marking.
- “Remove” asks: “Remove this contact? It no longer appears with the customer or in the selection. Inquiries that name it keep it.” After you confirm, the contact is gone.
A removed contact loses the marking as main contact and the portal access. You choose a new main contact yourself, eelikField does not choose one on its own. In the app too, the removed contact no longer appears as the contact person of an order.
Adding, changing or removing a location
Section titled “Adding, changing or removing a location”Open the “Locations” tab and click “Add location”. The fields and their meaning are on the Locations page. It also explains how to change a location with “Edit” and take it away with “Remove”, and when that is not possible.
Archiving a customer
Section titled “Archiving a customer”A customer cannot be deleted. If you no longer work for them, archive them:
- Open the customer page and click “Archive” at the top right.
- Confirm the prompt: “Archive this customer? It disappears from the customer list and from the selection for new inquiries, offers and orders. You can restore it at any time.”
- The page now shows the “Archived” badge and the note “This customer is archived. It does not appear in the customer list or in the selection for new inquiries, offers and orders.”
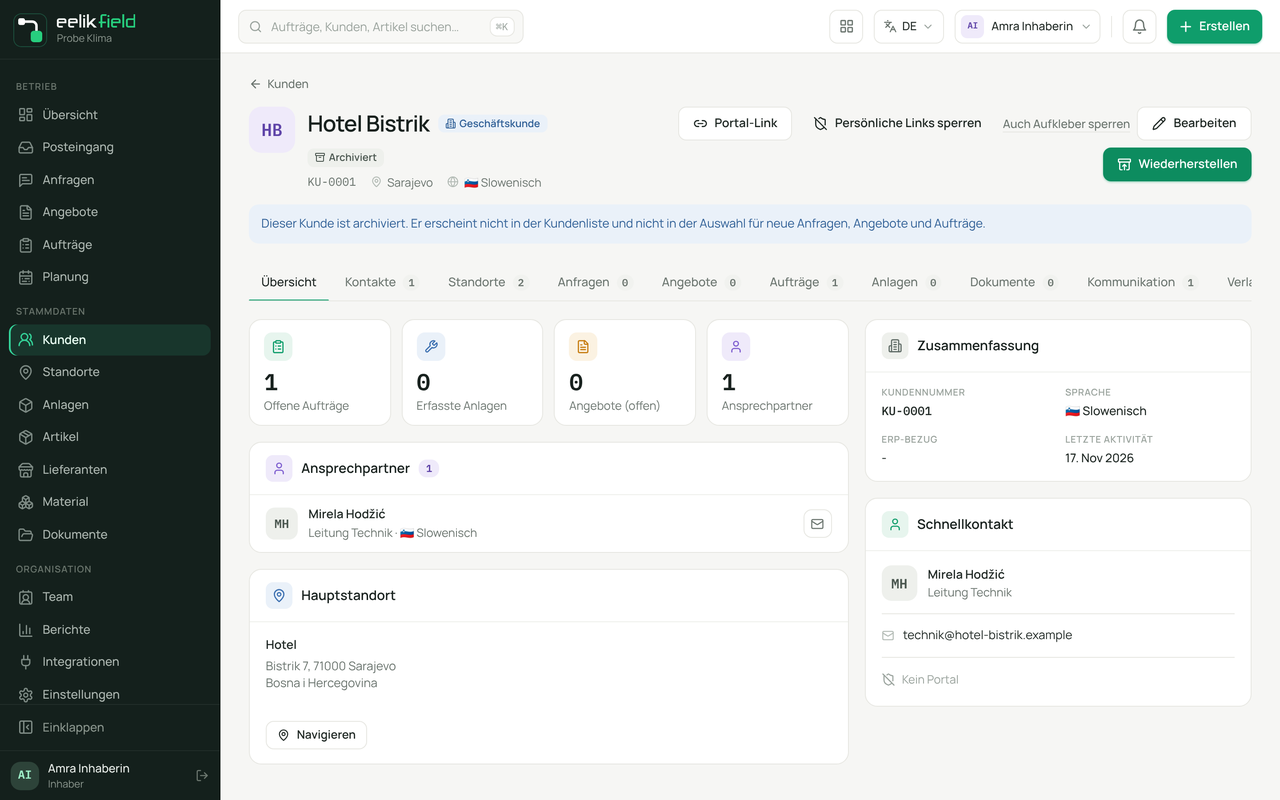
What happens as a result:
- The customer is missing from the customer list (except with the “Archived” button), from the selection for new inquiries, offers, orders, assets and messages, and from the “Locations” page.
- The customer’s existing orders, offers, inquiries and documents stay readable. Their customer portal stays reachable. If you want to block it, use “Block personal links”.
- For an archived customer, the buttons “Create inquiry”, “Offer” and “Appointment” are missing.
- Documents and the general search still find an archived customer, so that their records stay findable.
- With “Restore” the customer is immediately back everywhere. Archiving and restoring appear in the customer’s “History”.
Owners, administrators, office staff and dispatchers can archive and restore.
What you cannot do here
Section titled “What you cannot do here”- There is no way to delete a customer or merge it with another. You can only archive it.
- A removed contact or location cannot be brought back in the interface. Create it again if needed.
- Customers can be taken over from a file in large numbers: owners and administrators find the “Import wizard” for this under “Integrations” (CSV file, with a check before the import and detection of duplicates).
Frequently asked questions
Section titled “Frequently asked questions”I created a customer twice. A customer cannot be deleted or merged with another. Archive the surplus customer and create new orders only for the other one. The archived one stays readable with its old data.
A customer is missing from the list. It is probably archived. Choose “Archived” and then “Restore” on the customer.
I entered a contact person incorrectly. Choose “Edit” on their card and correct it. A new entry is not necessary.
Where do I enter the billing address? As a location, for example with the name “Head office”. A customer’s address is always on their locations.
The customer has several properties. Create one location per property. You then assign assets to the matching location (Assets).
Do I have to enter an ERP reference? No. Only if you hand customers over to the accounting program (e-računi).