
Inquiries
An inquiry is the moment when a customer wants something from you, but nothing has been agreed yet. A phone call, an email, a message on the phone or a message in the customer portal: you record it as an inquiry, clarify the details and turn it into an offer or straight into an order.
The roles owner, administrator, office and dispatcher create and edit inquiries. The warehouse does not see the area “Inquiries”.
The inquiry list
Section titled “The inquiry list”In the menu, open “Inquiries”. The page is called “Inquiries” and has the subtitle “Qualify incoming customer inquiries and turn them into offers”.
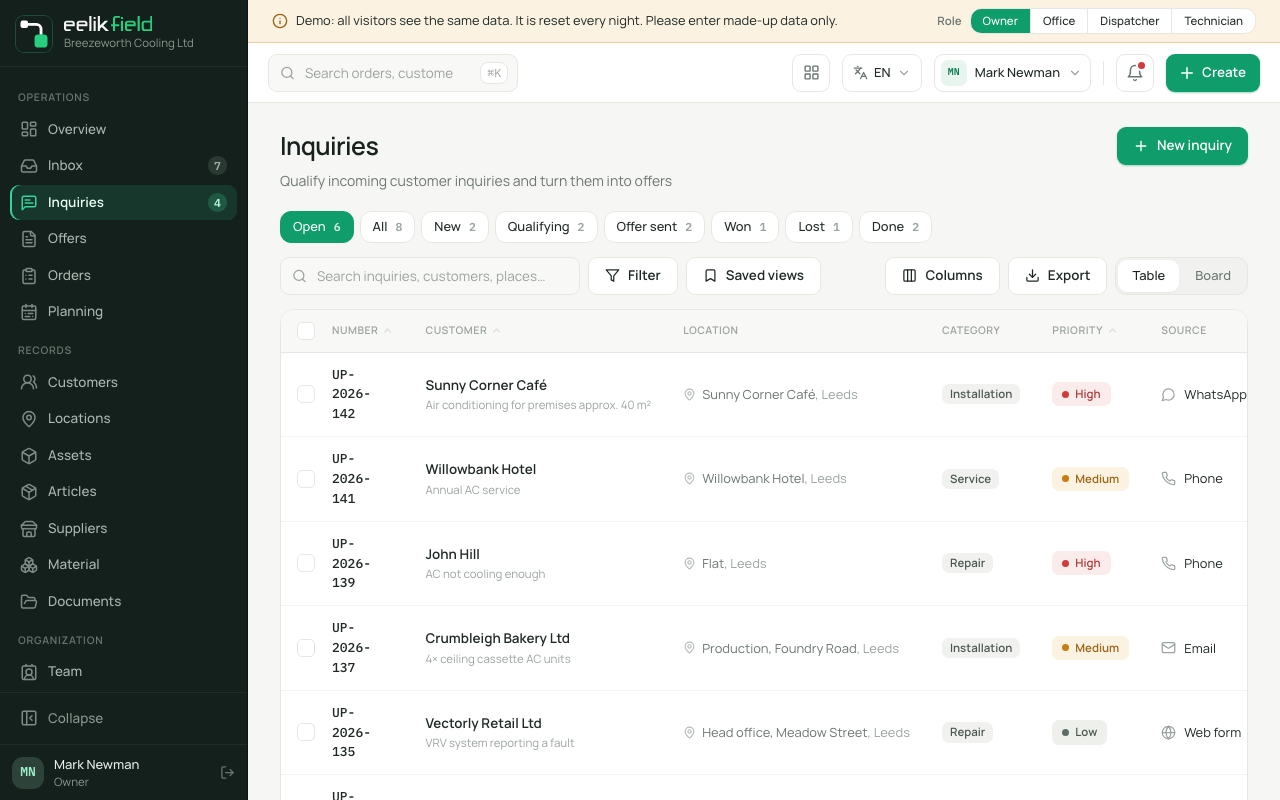
The views at the top, each with the number of inquiries:
| View | Shows |
|---|---|
| “Open” | All inquiries that are neither “Won” nor “Lost”. |
| “All” | All inquiries. |
| “New”, “Qualifying”, “Offer sent”, “Won”, “Lost” | One status each (see below). |
| “Done” | “Won” and “Lost” together. |
In addition, under “Saved views” there are three presets: “Open inquiries”, “My inquiries” (the ones assigned to you) and “This week” (the ones received in this calendar week). A second click on the same preset removes it again.
The columns of the table: “Number”, “Customer” (with the subject below), “Location”, “Category”, “Priority”, “Source”, “Status”, “Assignee”, “Created” and “Next action”. With “Columns” you hide some of them.
The search “Search inquiries, customers, places…” finds number, customer, location, place and subject. The filters “Category”, “Priority” and “Source” narrow it down further. “Export” downloads the list as a file.
Table or board
Section titled “Table or board”In the toolbar above the list you switch between “Table” and “Board”. The board shows a column of cards for each status. A card carries the number, priority, customer, subject, place and the person in charge. You drag a card into another column to change the status. A button on the card leads to the next step:
| Column | Button on the card |
|---|---|
| “New” | “Qualify” (sets “Qualifying”) |
| “Qualifying” | “Create offer” |
| “Offer sent” | “Won” (sets “Won”) |
| “Won” | “Create order” |
| “Lost” | no button |
Assigning several inquiries at once
Section titled “Assigning several inquiries at once”In the table, tick several inquiries. A bar appears: “3 inquiries selected”. With “Assign” and the selection “Assign to” you hand all of them to the person you choose. With “Export” you download only the selected ones.
Creating an inquiry
Section titled “Creating an inquiry”- In the list, click “New inquiry”.
- The “New inquiry” page opens: “Capture a customer inquiry and assign it to a responsible person”.
- Fill in the sections.
- Click “Create inquiry”.
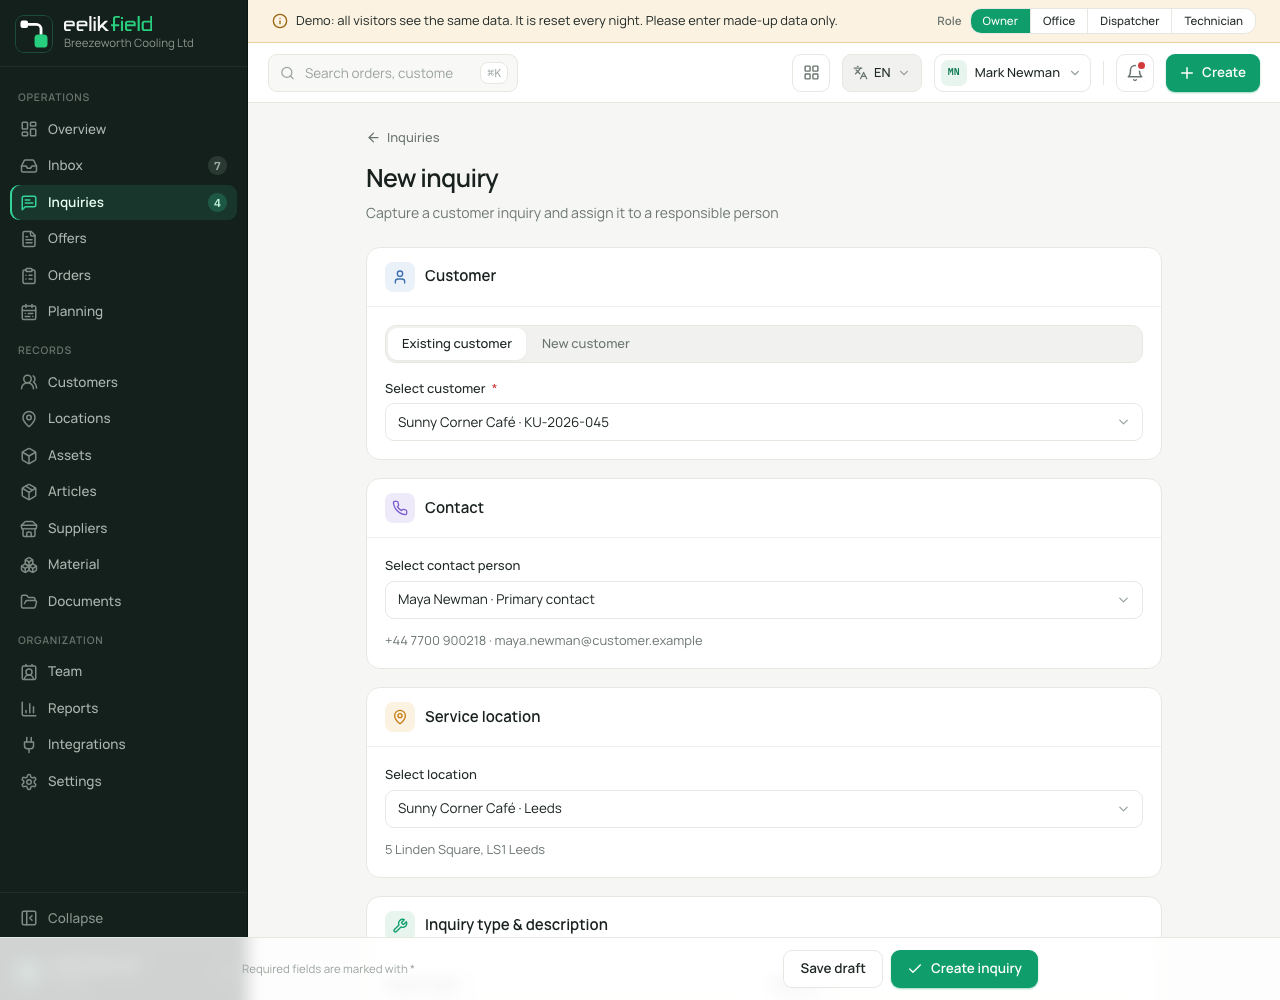
| Section and field | Meaning | Required |
|---|---|---|
| “Customer”: “Existing customer” or “New customer” | Choose an existing customer (“Select customer”), or create a new one. Then you enter “Company / customer name” and choose the “Customer type”: “Business” or “Private”. | yes |
| “Contact”: “Contact”, “Phone”, “Email” | For an existing customer, you choose the “Contact” (“Primary contact” is marked). For a new customer, you enter the details. | no |
| “Service location”: “Street & number”, “ZIP”, “City”, “Access / notes” | For an existing customer, you choose the “Location” (removed locations and archived customers cannot be chosen). For a new customer, you enter the address. The location of the new customer gets your company’s country. Under “Access / notes” you put, for example, doorbell, floor, parking. | no |
| “Inquiry type & description”: “Inquiry type”, “Subject”, “Description” | What is it about? The “Subject” is a short summary. In the “Description” goes what the customer wants: condition, room size, specifics. | “Subject” yes |
| “Classification”: “Priority”, “Requested timeframe”, “Customer language”, “Source” | “Requested timeframe” is free text, for example “e.g. before summer, week 30, urgent…”. The “Source” says where the inquiry came from: “Phone”, “WhatsApp”, “Email”, “Web form” or “Portal”. | no |
| “Assignment & internal note”: “Responsible (office)”, “Internal note” | Who takes care of it. The customer does not see the note (“Visible internally only”). | no |
If the customer or subject is missing, it says “Please select a customer and fill in the subject.” (for a new customer “Please fill in the customer name and subject.”). If the customer has no contact person or no location, it says “No contact person on file for this customer.” or “No location on file for this customer.”
Inquiries also arise by themselves:
- From the customer portal: If a customer reports “Request service” there, eelikField creates an inquiry with the source “Portal” (see Customer portal).
- From a message: In the inbox, “Create inquiry” creates an inquiry from a customer message (see Messages).
A new inquiry has the status “New”. For new inquiries there is the notification “New inquiry” (see Messages).
The inquiry in detail
Section titled “The inquiry in detail”You open an inquiry with a click on its row. At the top are the number, status, priority and subject, below them the progress bar “New”, “Qualifying”, “Offer sent”, “Won” with the button “Lost” next to it. A click on a step sets the status. Below follow customer, contact person, priority, responsible and “Next action”.
The buttons at the top:
| Button | Effect |
|---|---|
| “Send query” | Jumps to the input field to write to the customer. |
| “Plan site visit” | Opens the planning board with this inquiry. There you create an appointment without an order, a site visit (see Planning board). |
| “Earliest slot (AI)” | Only if the AI is set up (see AI planning). |
| “Create offer” | Opens the offer editor for this customer (see Offers). |
| Menu “More actions” | “Change status” (Qualifying, Offer sent, Won), “Create order” and “Reject inquiry”. |
At the bottom you find: the description, the attachments (photos and PDFs with “Add”; “Delete attachment” asks: “Really delete this attachment?”), the communication, the card “Linked” with the related “Offers” and “Orders”, and the “Site visit” if one is planned.
Writing with the customer and within the team
Section titled “Writing with the customer and within the team”In the field below, you choose whether your text goes to the customer (“Write a reply to the customer…”, “Sent to the customer”) or stays an internal note (“Write an internal note… (not visible to the customer)”, “Visible internally only”). This way you collect everything about the inquiry in one place.
The statuses of an inquiry
Section titled “The statuses of an inquiry”| Status | Meaning |
|---|---|
| “New” | The inquiry has come in and has not been checked yet. Next action: “Qualify”. |
| “Qualifying” | You clarify details: what exactly, where, when, with what effort? |
| “Offer sent” | There is an offer that the customer still has to answer. |
| “Won” | The customer has agreed. On the board, the button for it is “Won” as well. Next action: “Create order”. |
| “Lost” | The inquiry is rejected or has been dealt with. |
The “Next action” in the list is a suggestion that fits the status: “Qualify”, “Create offer”, “Call customer”, “Schedule” or “Follow up”.
The inquiry automation
Section titled “The inquiry automation”eelikField moves the status on by itself in two cases, so that the open list does not grow forever:
- If you create an offer from the inquiry, it jumps from “New” or “Qualifying” to “Offer sent”.
- If you create an order from the inquiry or from its offer, it becomes “Won”. If the customer accepts the offer in the portal, the same applies.
The status only jumps forward. An inquiry that you set to “Won” or “Lost” by hand stays that way. Owners and administrators switch both on or off under “Settings”, “Inquiry automation”.
Rejecting an inquiry
Section titled “Rejecting an inquiry”- Open the inquiry and choose “Reject inquiry” in the menu “More actions”. Or click “Lost” next to the bar.
- It says: “Do you really want to reject this inquiry? It will be marked as “Lost”.”
- Confirm with “Reject”.
The inquiry is kept and appears in “Done”.
From inquiry to order
Section titled “From inquiry to order”There are two ways:
- With an offer: “Create offer”, send it, the customer accepts, then order (see Offers).
- Without an offer: Through “Create order” in the menu “More actions”, an order is created immediately with the customer, the subject, the description, the category, the priority and the responsible person of the inquiry (see Orders). Or click “Create order” on the board at “Won”. Then the “New order” page opens, pre-filled with the data of the inquiry.
On the order there is then the reference “Linked inquiry” with the number.
Good to know
Section titled “Good to know”- An inquiry cannot be deleted. Reject it if you no longer need it.
- The offer hangs on the inquiry: In the card “Linked” you see it with its status.
- Inquiries that still need a site visit appear on the planning board on the left under “Inquiries / Site visits”.
Frequently asked questions
Section titled “Frequently asked questions”Where do I record a phone call? As a new inquiry with the source “Phone”. Write in “Description” what the customer wants, and in “Internal note” what only you should know.
The customer has not been created yet. In the section “Customer”, choose “New customer”. The customer is created together with the inquiry.
Can I hand an inquiry to someone else? Yes. Assign it in the list with “Assign”. Owners, office and dispatchers are available to choose from.