

Team
On the “Team” page, you manage all the people in your business. All roles except the technician can see it. Owners, admins, office staff and dispatchers may invite people, add a technician and log absences. Only owners and admins may change roles, deactivate people, create teams and set the field work switch. The exact split is explained on the page Users and roles.
You find “Team” in the left menu in the “Organization” group.
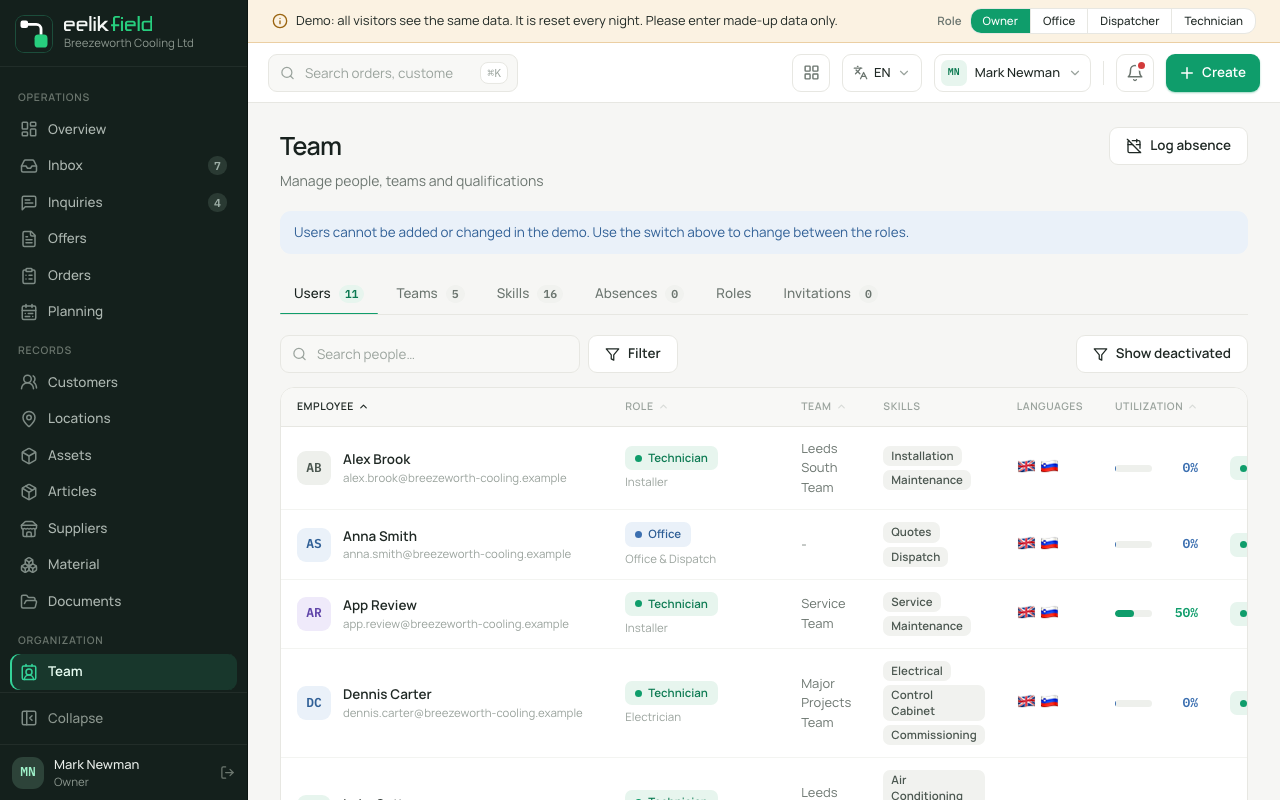
The page at a glance
Section titled “The page at a glance”At the top right are up to three buttons:
- “Log absence”: for holiday, sickness and other absences (Absences).
- “Add technician”: adds a person with just a name, without an email address.
- “Invite user”: invites a person by email link.
Below that are six tabs:
| Tab | Content |
|---|---|
| Users | All people with role, team, skills, languages, utilization and status. |
| Teams | Groups of people with a region. |
| Skills | How many people have which skill. |
| Absences | Who is absent today and who soon. |
| Roles | The “Permissions” table: what each of the six roles may do (see Users and roles). |
| Invitations | Invitations that are still open. |
The “Users” list
Section titled “The “Users” list”The list shows for each person: name and email address, role, team, skills, languages, utilization and status (“Busy”, “Available”, “Absent” or “Deactivated”). If someone has no email address, it says “App only, no web login”. A green badge “Field” next to the role shows that a person from the office can also be scheduled for field work.
- Searching: the “Search people…” field searches by name, role and skill.
- Filtering: the “Role” filter shows only people with one role.
- Deactivated: they are hidden at first. With “Show deactivated”, you show them.
- Sorting: click a column heading.
A click on a row opens the person’s profile on the right-hand side. There you see contact details, the “App” block (app access), the field work switch, the working hours, team and role, skills, the “Utilization” (“of capacity scheduled”), “Appointments today”, “Upcoming appointments” and the “Permissions”. At the bottom is the “Edit” button. It opens the “Edit member” dialog in the settings. Only owners and admins see the button, because only they may open the settings. Office and Dispatcher see the profile without this button.
Inviting a person
Section titled “Inviting a person”The person gets a link by email, sets their password and then has access with the chosen role.
- At the top right, click “Invite user”.
- In “Email address”, enter the person’s address, for example name@company.com.
- Choose the “Role”. “Technician” is preselected. You can also choose “Office” and “Dispatcher”, for owners and admins also “Admin”, and only for owners “Owner”. The “Warehouse” role is not available when inviting (see below).
- Click “Create invitation”.
- You see “Invitation created”. If email sending is set up, it says “Invitation sent by email.” Otherwise, “Email sending is not set up: please share the link manually.” or, if sending failed, “The email could not be sent: please share the link manually.”
- Under “Invitation link” is the link. Click “Copy” and, if necessary, pass it on yourself. With “Invite another”, you create the next invitation.
The invitation is valid for 7 days and works only once. What the invited person does is explained on the page Sign in. An invited technician also gets a note in the email on how to set up the app.
You also find the same invitation function under “Settings”, “Users”, with the “Add” button. However, there the role list contains only “Office”, “Dispatcher”, “Technician” and, for owners, “Owner”, with no “Admin”.
Managing open invitations
Section titled “Managing open invitations”In the “Invitations” tab, you see each open invitation with address, role (“Invited as …”) and date, and the status “Pending”.
- “Create new link”: the old link, including the one in the email, becomes invalid immediately. No new email goes out: you pass on the new link yourself. It is valid for 7 days again. Only someone who would be allowed to send such an invitation themselves sees the button.
- “Revoke”: the invitation is then invalid and disappears from the list.
If the person is deactivated, no invitation helps: “This person is deactivated. An invitation does not restore access: they need to contact the administration (an owner or admin can reactivate them).”
Adding a technician without email
Section titled “Adding a technician without email”Many technicians have no email address of their own or do not need one. A name is enough for them. The employee works only with the app. You also add a Warehouse member this way.
- Click “Add technician”. “Add technician without email” opens.
- Enter the “Name” (at least 2 characters).
- Choose the “Role”: “Technician” or “Warehouse”. “Technician” is preselected.
- Optional: “Phone (optional)”. If there are already teams, “Team (optional)” also appears there.
- Click “Add and send app access”.
- The dialog for app access opens directly. There, choose “Send a link” or “Show QR code here” (App access).
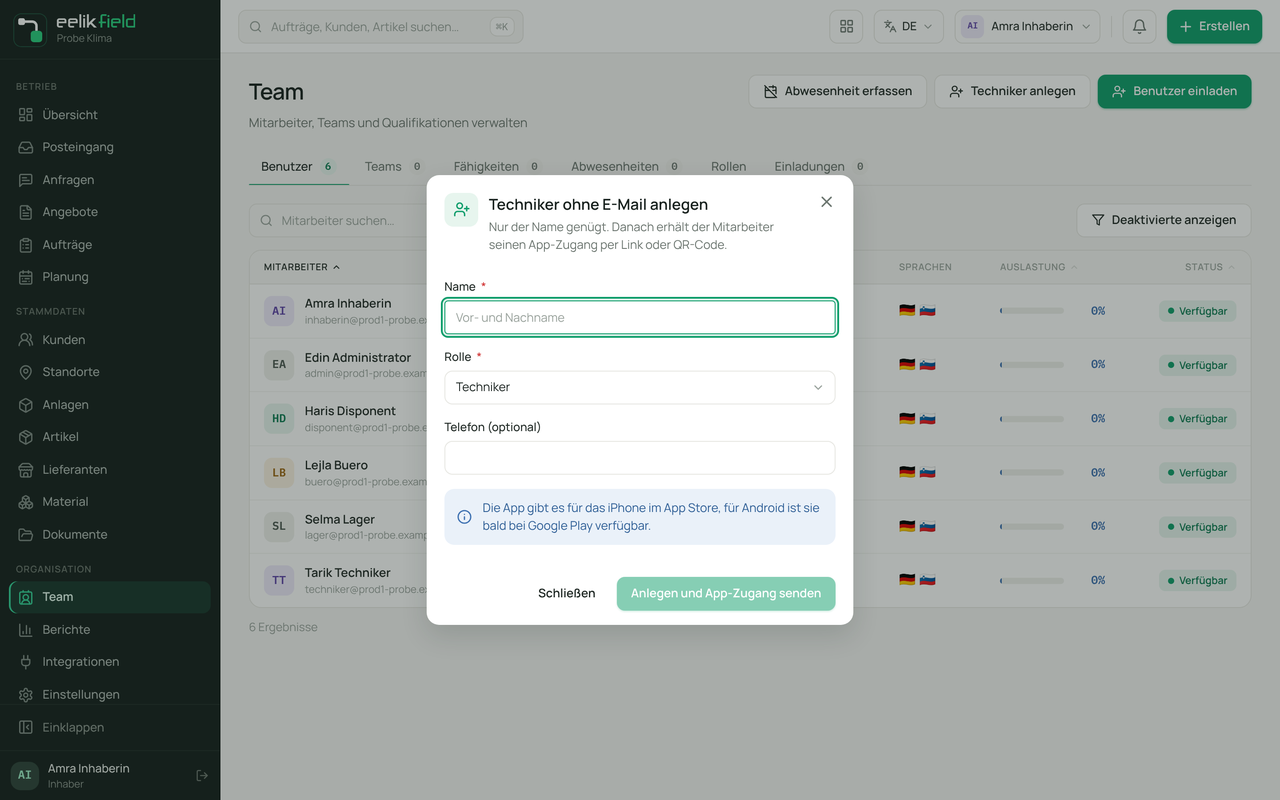
If there is already someone with the same name, eelikField warns: “There is already an employee with this name. Please check whether that is intended.” The person is added anyway.
The person appears in the list with “App only, no web login”. They cannot sign in in the browser and get no emails. This can be made up for later: in the profile under “App” is the button “Add email”. After that, the person can set a password via “Forgot password?”. Until they do, you can still change the address with “Correct email”, for example after a typing mistake. If they set a password later, the app signs out once, and the person then signs in with email and password.
Changing a person’s role
Section titled “Changing a person’s role”Owners and admins may do this.
- Open “Settings”, then “Users” (or, as an owner or admin, click “Edit” in the profile).
- In the person’s row, click the pencil icon. “Edit member” opens.
- Change the “Role” and click “Save”.
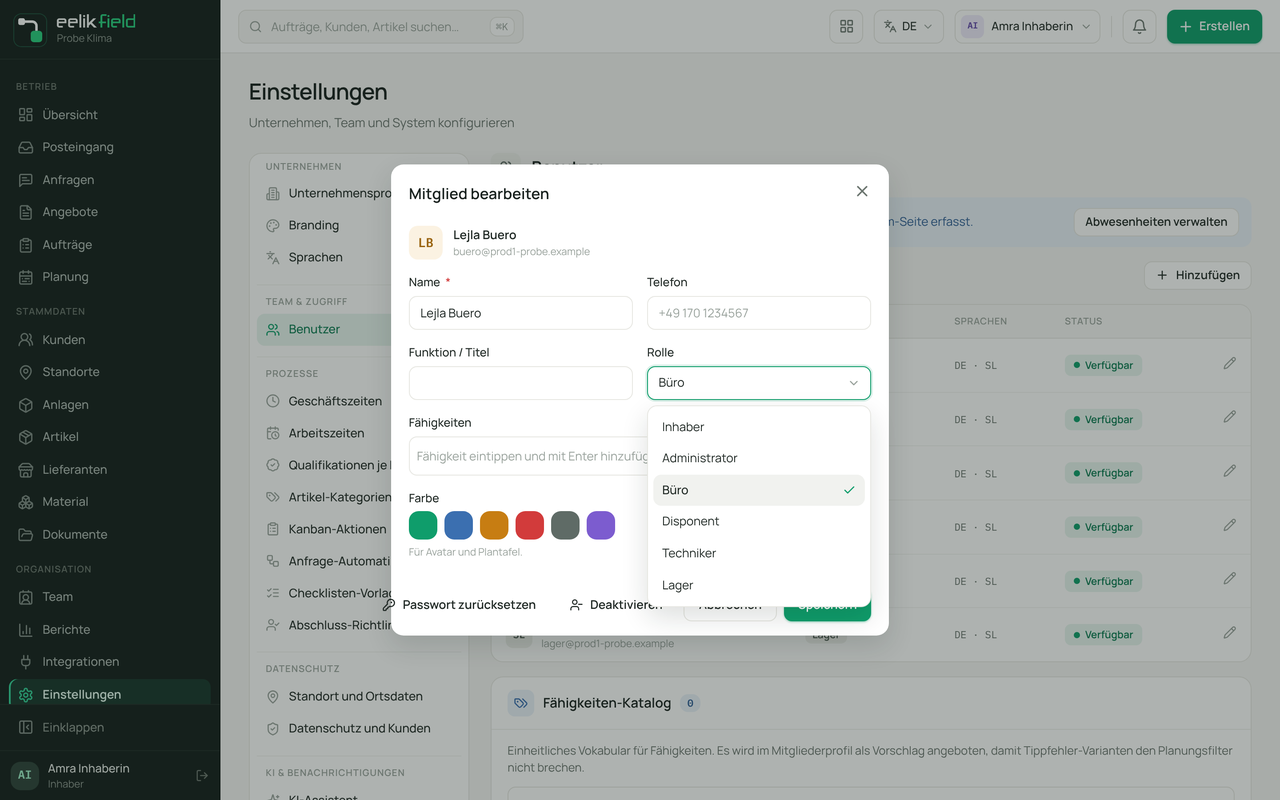
In the dialog, you also change:
| Field | Meaning | Required |
|---|---|---|
| Name | The display name, 2 to 120 characters. | Yes |
| Phone | The number, at most 40 characters. | No |
| Job title | The job description, for example “Operations manager”. It appears in the list under the role. | No |
| Role | All six roles: Owner (only an owner assigns it), Admin, Office, Dispatcher, Technician, Warehouse. | Yes |
| Skills | Qualifications, see below. | No |
| Color | The colour for the avatar and planning board. A second click on the chosen colour removes it. | No |
You cannot raise your own role, and the last active owner stays an owner. When changing from a field role to an office role (or to Owner), eelikField asks before saving: “The person’s devices will be signed out. The person then sets up the app again.” For a higher role for a person whose email address the office entered, the question “Confirm email address” appears. The page Users and roles explains both.
At the bottom left of the dialog are “Reset password” (not for people without email) and “Deactivate” or “Reactivate” respectively.
The “Also works in the field” switch
Section titled “The “Also works in the field” switch”Owner, Admin, Office and Dispatcher normally work in the office and are therefore not schedulable on the planning board. But anyone who also goes out to the customer themselves switches the switch on. Then the person counts like a technician: they can be scheduled and see their appointments in the app. Their role and their rights in the office stay the same.
- Open “Team” and click the person’s row.
- In the profile, switch on “Also works in the field”.
- You see “
can now be scheduled.” In the list, the badge “Field” appears next to the role.
If you switch it off again, the person is no longer scheduled anew. Existing appointments stay: “
Good to know:
- For technicians, the switch does not exist: they can always be scheduled. The warehouse can never be scheduled.
- Owners and admins set the switch. If you set it for yourself, that is allowed. Only an owner sets an owner’s switch.
- As long as nobody can be scheduled, the empty planning board says “Nobody to schedule yet”, with the note to add a technician or switch on the switch, and the link “Open team page”.
If you work alone: switch it on for yourself. Without it, you appear neither on the planning board nor in the selection for appointments (Working alone as an owner).
Qualifications (“Skills”)
Section titled “Qualifications (“Skills”)”Qualifications are short keywords for what someone can do, for example “Refrigeration” or “Gas”. In the team list and in the “Edit member” dialog, they are called “Skills”, and on the planning board they are called “Skills” too.
- Entering them for a person: in the “Edit member” dialog, type into the “Skills” field and confirm with Enter (or comma). With the small cross, you remove one. There are at most 20 per person and 40 characters per entry.
- Catalogue: so that typing mistakes do not disturb the filters, there is the “Skills catalog” under “Settings”, “Users”: a shared vocabulary that appears as a suggestion while you type. Words that are entered are adjusted to the spelling of the catalogue. You may still enter new words freely.
- Use: the planning board filters people by skill. An order can say which skill it needs. If the scheduled person does not have it, the planning board shows only a note (Skills).
In the “Skills” tab, you see how often each skill occurs. A click on an avatar opens the profile.
Teams and regions
Section titled “Teams and regions”A team is a group of people, for example “HVAC North”. It has a name and a region, which is the group’s home base, for example “Greater Vienna”. The planning board can filter people by region. The regions of the teams and the places of your customers count here.
In the “Teams” tab, only owners and admins create teams:
- Click “Create team”.
- Enter the “Team name” (for example “HVAC North”) and optionally the “Region”.
- Click “Create team”.
- On the team’s card, choose people under “Choose a member…”. Anyone who is already in another team is moved (“Already in a team: will be moved.”). Each person belongs to at most one team.
- With the pencil, you edit name and region, with the bin you delete the team, and with the cross on a person you “Remove from team”.
When deleting, eelikField warns: “Delete this team? Members are kept and only removed from the team.” Without teams, everything works; teams are an organising aid.
Individual working hours per person
Section titled “Individual working hours per person”In the profile, in the “Working hours” block, owners and admins set for each weekday whether the person works like the business, has their own time or does not work. The full guide is on the page Working hours.
App access
Section titled “App access”In the profile under “App”, you see whether the person has set up the app, and you send the access with “Send app access”. Everything about this is on the page App access.
Deactivating or unblocking a person
Section titled “Deactivating or unblocking a person”There is no way to delete a person. This is deliberate: otherwise the person’s appointments, time entries and service entries would no longer be traceable. Instead, you deactivate them. This blocks access immediately everywhere: browser, app and interface.
- Open “Settings”, “Users”, click the pencil in the person’s row, then “Deactivate” at the bottom left.
- “Deactivate member” opens with the note that access is blocked immediately.
- If the person has future appointments, “Future appointments” appears there. For each appointment, choose “Unschedule” or “Assign to:” and a colleague. Unscheduled orders fall back into the sidebar of the planning board. Only schedulable people are available to choose.
- Open orders where the person is listed as responsible appear under “Open assigned orders”. Their assignment is removed unless their appointment is reassigned.
- If there is nothing to sort out, it says there that there are no future appointments and no open orders and that the deactivation does not affect the planning.
- Click “Deactivate now”.
Two protection rules apply: you cannot deactivate yourself, and the last active owner cannot be deactivated.
What the person sees afterwards:
- In the browser: they can no longer sign in to your business. If they have no other workspace, they see the “No workspace” page.
- In the app: on its next contact, they are signed out. When signing in, it says “No active workspace for this account.”, and when setting up with a link, “Your access is blocked. Please contact the office.”
- Open app access links of the person become invalid.
Reactivating: show the list with “Show deactivated”, open the person and click “Reactivate”. This is the only way back. A new invitation is not enough. The old app access stays blocked: the person signs in again or gets new app access.
Frequently asked questions
Section titled “Frequently asked questions”An employee did not get the invitation. Look in the “Invitations” tab. Click “Create new link” and send them the link yourself, for example by WhatsApp.
Can I assign a person to several teams? No, a person belongs to at most one team.
I made a typing mistake in the email address of an invitation. Revoke the invitation in the “Invitations” tab and invite again with the correct address.
Why do I not see an “Edit” button in the profile? It leads to “Settings”, and those are reserved for owners and admins. As Office or Dispatcher, you therefore do not see it.