

Assets and service book
An asset is a device that you install or service for a customer, for example an air conditioner or a heating system. Every asset has a digital service book: master data, maintenance plan, warranty, photos, documents and the whole service history. That way you know straight away at the next service what was done last time.
Owners, administrators, office staff and dispatchers can view and create assets. The same roles maintain service entries, the maintenance plan and photos. The warehouse and technicians do not see the “Assets” page. Technicians see the assets of their jobs in the app (Asset QR in the app). You find “Assets” in the left-hand menu in the “Master data” group.
Recording an asset
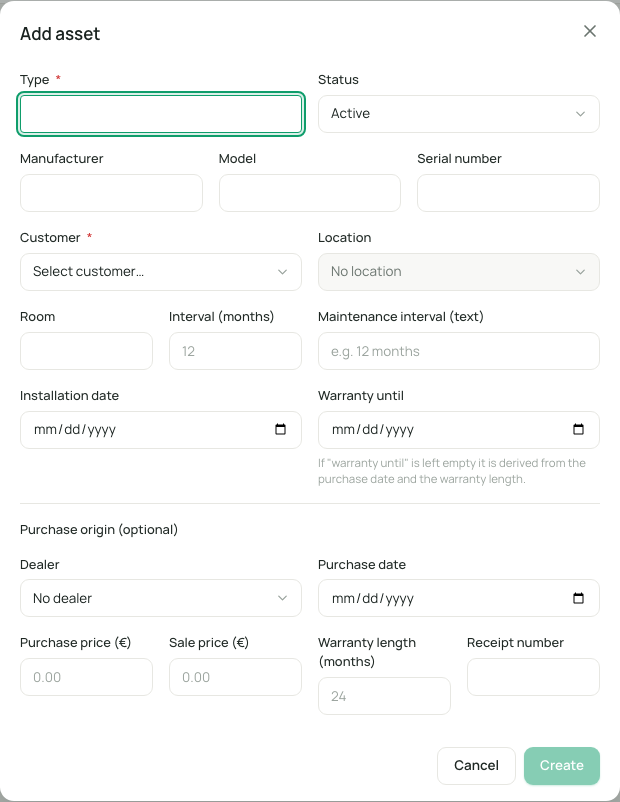
Section titled “Recording an asset”- Open “Assets” and click “Add asset” at the top right.
- Enter the “Type”, for example “Split air conditioner”. This is free text.
- Under “Customer”, choose the customer (“Select customer…”). The “Location” field then offers a list of that customer’s locations, or “No location”.
- Fill in further fields as far as you know them: manufacturer, model, serial number, room, installation date.
- Click “Create”. eelikField opens the service book of the new asset.
Every asset automatically gets an asset number according to your number range, for example AST-2026-001 (Company).
| Field | Meaning | Required |
|---|---|---|
| Type | What kind of device it is. | Yes |
| Status | “Planned”, “Installed”, “Active”, “Service due”, “Faulty”, “Out of service” or “Removed”. The default is “Active”. | No |
| Manufacturer, Model, Serial number | The details from the nameplate. | No |
| Customer | Which customer the asset belongs to. | Yes |
| Location | Where it is. Only the locations of the selected customer are offered. | No |
| Room | The room, for example “Office 2nd floor”. | No |
| Interval (months) | How many months pass between services, for example 12. eelikField uses it to calculate the next service date after every service. | No |
| Maintenance interval (text) | A description of the interval, for example “12 months”. | No |
| Installation date | When the asset went into operation. | No |
| Warranty until | End of the warranty. | No |
Purchase origin (optional)
Section titled “Purchase origin (optional)”The same window has the “Purchase origin (optional)” block. It is meant for the office and is never visible in the customer portal.
| Field | Meaning |
|---|---|
| Dealer | The dealer where the device was bought. It comes from your “Suppliers” list (Suppliers). |
| Purchase date | When it was bought. |
| Purchase price, Sale price | Amounts in your currency. The service book shows the “Margin” from them. |
| Warranty length (months) | How long the warranty runs. |
| Receipt number | The number of the invoice. It proves a warranty claim. |
If you leave “Warranty until” empty, eelikField calculates the date from the purchase date and the warranty period. A date you enter by hand always applies.
The asset list
Section titled “The asset list”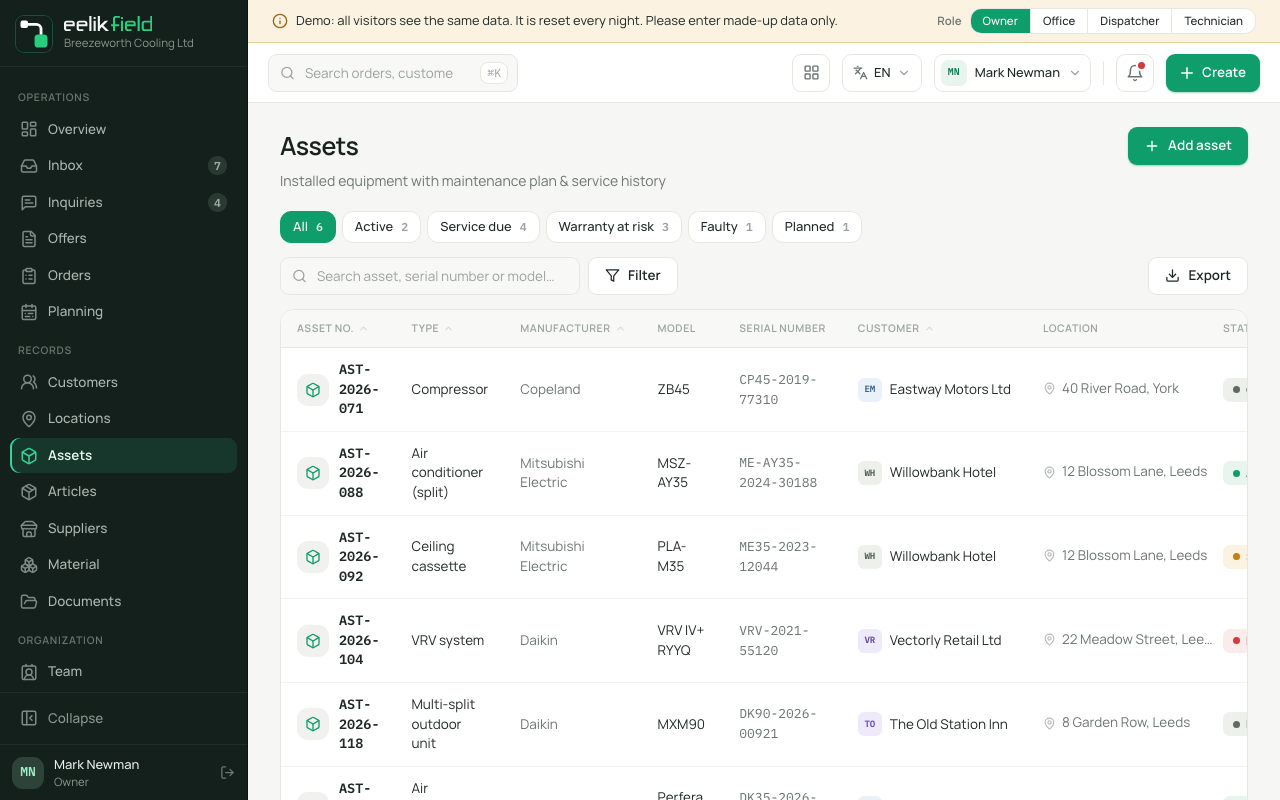
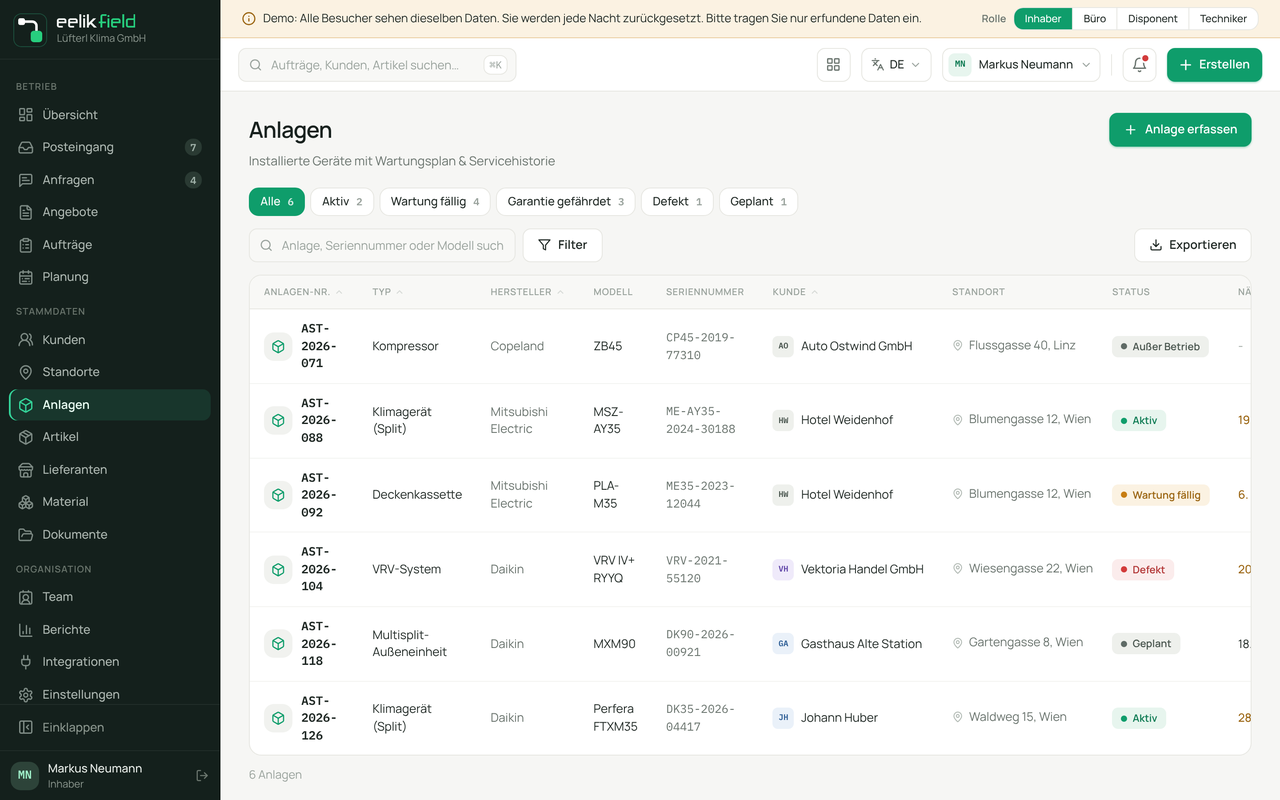
For each asset the list shows: asset no., type, manufacturer, model, serial number, customer, location, status, “Next service”, “Last service” and “Warranty until”. On smaller screens some columns are hidden. Services that are due are orange. If the warranty is at risk, a warning sign appears in front of the date.
- Search: “Search asset, serial number or model…” searches by number, type, manufacturer, model, serial number, customer and location.
- Views: “All”, “Active”, “Service due”, “Warranty at risk”, “Faulty” and “Planned”. “Service due” shows all assets that are “Service due” or “Faulty” or whose next service is today or earlier.
- Filters: “Status” and “Manufacturer”. In the filter and in the export, the statuses have the same names as on the badges in the list, for example “Out of service”.
- Export: “Export as CSV” or “Export as Excel”.
- Pages: 50 assets per page.
The customer page lists all of a customer’s assets in the “Assets” tab (Customers).
The service book of an asset
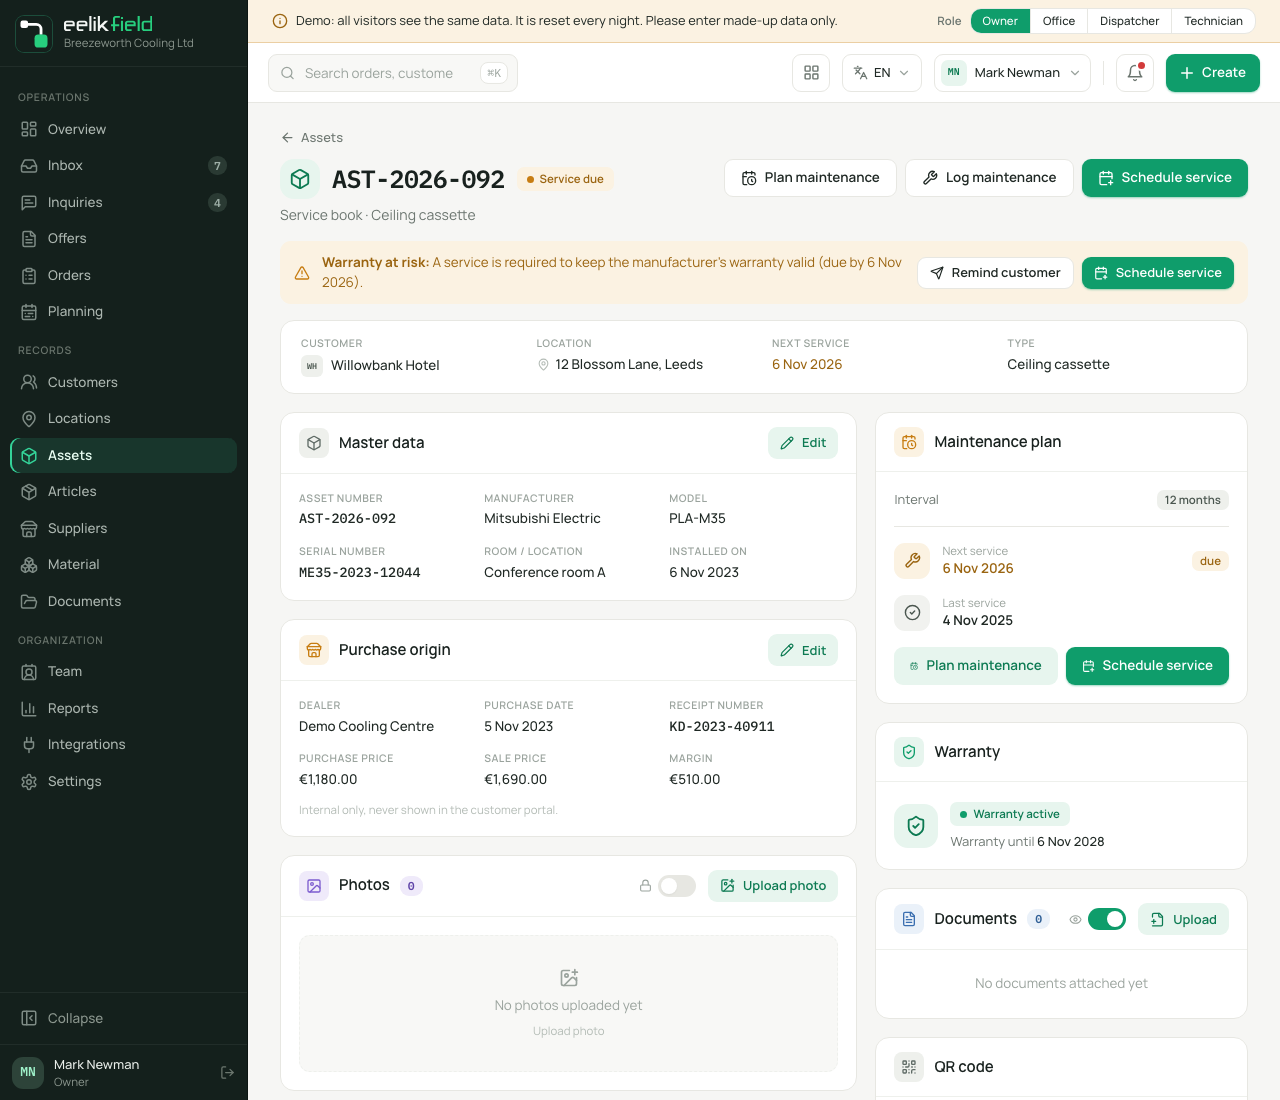
Section titled “The service book of an asset”Click a row to open the service book (“Digital asset & maintenance log”). At the top you see the type, manufacturer and model, the status, the customer and location and the next service. At the top right are the three most important buttons:
| Button | What it does |
|---|---|
| “Plan maintenance” | Sets the maintenance plan: date of the next service and interval. |
| “Log maintenance” | Records a service, repair or fault that has been carried out in the service history. |
| “Schedule service” | Schedules a service appointment for a technician on the planning board. |
Below them are cards:
- Master data with asset number, manufacturer, model, serial number, room and installation date, plus “Purchase origin” with “Margin”.
- Photos of the asset.
- Service history: the timeline of all entries.
- Maintenance plan with interval, “Next service” and “Last service”.
- Warranty: “Warranty active” or “Warranty expired” with a date, or “No warranty details”.
- Documents and the QR code.
- Contact: The customer’s main contact with a call button.
With “Edit” you can change all the master data later: type, status, manufacturer, model, serial number, room, customer, location, installation date, “Warranty until”, “Last service”, “Next service”, the intervals and the purchase origin.
Recording a service entry
Section titled “Recording a service entry”- Click “Log maintenance”. “Log service” opens.
- Choose the “Kind”: “Maintenance”, “Repair”, “Spare part” or “Fault”.
- Check the “Date” (today is preselected).
- Choose the “Performing technician”.
- Under “Description”, describe what was done (“What was carried out?”). This is a required field.
- Optionally, under “Parts & services”, enter replaced parts: choose an article from your article master or “Free text…”, plus quantity and unit. “Add part/service” adds a line.
- Optionally, under “Photos & documents (optional)”, attach files. For each file you choose a “Category” (“Before”, “During”, “After”, “Nameplate”, “Damage”, “Material”, “Document”), a “Caption” and whether it is “Customer-visible” or “Internal”.
- Click “Save entry”.
The kind “Maintenance” has an extra effect: the date becomes the “Last service”. If the asset has an interval in months, eelikField automatically sets the “Next service” that many months later. If the asset was “Service due”, it goes back to “Active”.
Click an entry in the service history to open the “Service entry” with the technician, replaced parts and the date it was recorded. There you change the entry with “Edit entry” and switch its visibility with “Make customer-visible” or “Set to internal”. The lock next to an entry means “Internal”: internal entries do not appear in the customer portal.
Setting the maintenance plan
Section titled “Setting the maintenance plan”- Click “Plan maintenance”. “Plan maintenance” opens.
- Enter the “Next service” as a date.
- Enter the “Interval (months)”. It is used for the automatic date calculation after each service.
- Optionally add the “Maintenance interval (text)”, for example “12 months”.
- Click “Save plan”.
If the next service is today or in the past, eelikField automatically sets the asset to “Service due”. It does not touch states that you set yourself (“Faulty”, “Out of service”, “Removed”).
Scheduling a service appointment
Section titled “Scheduling a service appointment”“Schedule service” opens a window: choose the “Technician”, the “Date”, “Start” and “End” and optionally a “Note”. With “Create appointment” the appointment is on the planning board (“Service appointment scheduled.”). Only people who can be scheduled are offered (Team). If there is an overlap (“Overlaps with …”) or the technician is absent (“The technician is absent on this day.”), eelikField asks “Schedule anyway?”. With “Schedule anyway” you force the appointment.
Keeping an eye on the warranty
Section titled “Keeping an eye on the warranty”A manufacturer’s warranty often stays valid only if the prescribed service is carried out. eelikField therefore marks an asset as “Warranty at risk” when two things apply: the warranty is still running, and the next service is due within 30 days or is already overdue.
You then see the note “Warranty at risk:” in the service book, with the sentence “A service is required to keep the manufacturer’s warranty valid (due by …).” With “Remind customer”, eelikField sends the customer a maintenance reminder by email (“Warranty reminder sent to the customer.”). The second button lets you schedule the service straight away. The list has the “Warranty at risk” view for this.
Photos and documents
Section titled “Photos and documents”- Upload a photo: On the “Photos” card. Images are allowed.
- Documents “Upload”: Images and PDF files are allowed, each up to 15 MB. Otherwise you see “File type not supported (images or PDF).” or “File too large (max. 15 MB).”
- The eye or the lock next to a file switches between “Customer-visible” and “Internal”. Before uploading, you set the default with the small switch.
- With the bin you delete a file after a confirmation prompt (“This file will be permanently deleted”).
The asset’s QR code
Section titled “The asset’s QR code”The service book has a “QR code” card with the asset number and the note “Scan on-site for direct access to the service book.” The code leads to the asset’s page in the customer portal. Next to the code you see the address in plain text and the “Copy” button.
A sticker with this code on the asset helps on site: whoever scans it reaches the asset’s page in the customer portal. The customer sees the maintenance reports there with the PIN for QR stickers, which applies to all of this customer’s devices. It is shown, renewed or set by yourself on the customer’s “Assets” tab (Customer portal). The code stays valid until you choose “Block stickers too” on the customer.
Frequently asked questions
Section titled “Frequently asked questions”Do I have to record every asset by hand? Yes. Assets are not yet included in the import wizard. On the iPhone, however, a technician can also record an asset in the app (Asset QR in the app).
The asset shows “Service due” although I serviced it. Record the service with the kind “Maintenance”. eelikField then sets the next service again, but only if the asset has an interval in months. Otherwise, enter the next service yourself under “Plan maintenance”.
Can I delete an asset? Not in the interface. Set it to “Removed” or “Out of service”. An asset with a status other than “Removed” holds on to its location: such a location cannot be removed (Locations).
Does my customer see the margin and the purchase prices? No. “Purchase origin” is for the office only.