

Checklist templates
Many orders follow the same pattern: when servicing a gas heating system, you always check the same ten points. A checklist template is such a task list, which you create once. After that you copy it into an order with one click instead of typing every task again. The technician ticks off the tasks in the app.
Owners and administrators can create, change and delete templates (they are in the settings). Owners, administrators, office staff and dispatchers can apply templates to an order.
Creating a template
Section titled “Creating a template”- Open “Settings” and, in the “Processes” group, choose the “Checklist templates” section.
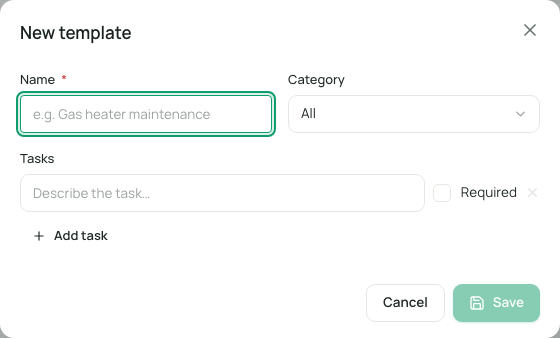
- Click “New template”. “New template” opens.
- Enter the “Name”, for example “Gas heating service”. It can be up to 80 characters long.
- Choose the “Category”: “All”, “Installation”, “Maintenance”, “Repair” or “Inspection”. The categories have the same names as the order types.
- Under “Tasks”, type the first task into the “Describe the task…” field.
- Tick “Required” if the task must be done before the order may be completed.
- With “Add task” you add the next one. With the bin next to a task you remove it (at least one task always stays).
- Save.
| Field | Meaning | Required |
|---|---|---|
| Name | What the template is called in the selection. | Yes |
| Category | What kind of orders the template is intended for. “All” means: for every type. The category is an assignment for the overview, it does not lock the template. | No (default “All”) |
| Task | The text of a task, up to 300 characters. Empty tasks are left out when you save. | At least one that makes sense |
| Required | Marks the task as a required task. | No |
A template can have up to 60 tasks.
In the list you see each template with its name, the number of “Tasks” and the category. With the pencil you change it (“Edit template”), with the bin you delete it after the prompt “Delete this template?”. Tasks that have already been applied in orders are not affected. If there are no templates, it says “No templates yet”.
Applying a template to an order
Section titled “Applying a template to an order”- Open the order and go to the “Tasks & checklist” section.
- Click “Template”. The button appears only if there is at least one template.
- Choose the template from the list. After the name comes the number of tasks, for example “Gas heating service · 10”.
- You see “Template applied”. The tasks are now in the order’s checklist.
The template’s tasks are appended. Tasks that are already in the order stay, including those that a technician added themselves. If you apply the same template twice, the tasks appear twice. The order’s history shows which template was applied.
You can also add individual tasks directly in the order: type the text under “New task…”, tick “Required” if needed and click “Add”.
What the checklist does in the app
Section titled “What the checklist does in the app”- The technician sees the tasks on the job and ticks them off (Checklist in the app).
- Required tasks must be done before the order can be completed in the app. Otherwise eelikField rejects the completion.
- Tasks without a tick at “Required” are a memory aid and do not hold up the completion.
Good to know
Section titled “Good to know”- Templates apply to the whole company.
- A template does not retroactively change orders to which it has already been applied. Editing a template only affects future applications.
- A template cannot be applied automatically when an order is created. You apply it by hand.
- The category of a template corresponds to the four order types (Order types).
Frequently asked questions
Section titled “Frequently asked questions”I do not see the “Template” button in the order. There is no template yet, or your role may not change tasks in the order. As an owner or administrator, create a template first.
Can the office create templates? No. Only owners and administrators can create, change and delete. The office applies them.
How many tasks can a template have? Up to 60, each with up to 300 characters.