Customer portal
The customer portal is a web page for your customers. The customer needs no account and no password. They open a personal link and see their offers, orders, appointments and devices there. They can accept an offer, ask for an appointment to be changed, request service and write to you. The page says: “Secure connection: no account needed.”
The portal carries the name and colour of your business. The roles Owner, Administrator, Office and Dispatcher create the links.
Which links there are
Section titled “Which links there are”There are two kinds of links:
| Kind | What for | How long valid |
|---|---|---|
| Personal links | The customer’s overview, a single order, an appointment or an offer. | A new link is valid for 180 days. If it is used in the second half, it is extended. The offer link from the email keeps the expiry date of the offer. |
| QR stickers on the device | The page of a single device with its service book and service history. | Never expires. The sticker stays on the device for years. It only becomes invalid if you block it. |
You usually do not have to send the links by hand. eelikField distributes them itself:
- The email for the offer carries the portal link (see Offers).
- The email with the work report and the email with the order confirmation carry the button “View in customer portal” (see Work report).
- You give the customer the overview yourself, if you wish (see below).
Creating the link of the overview
Section titled “Creating the link of the overview”The overview is the customer’s start page. From there they reach everything else.
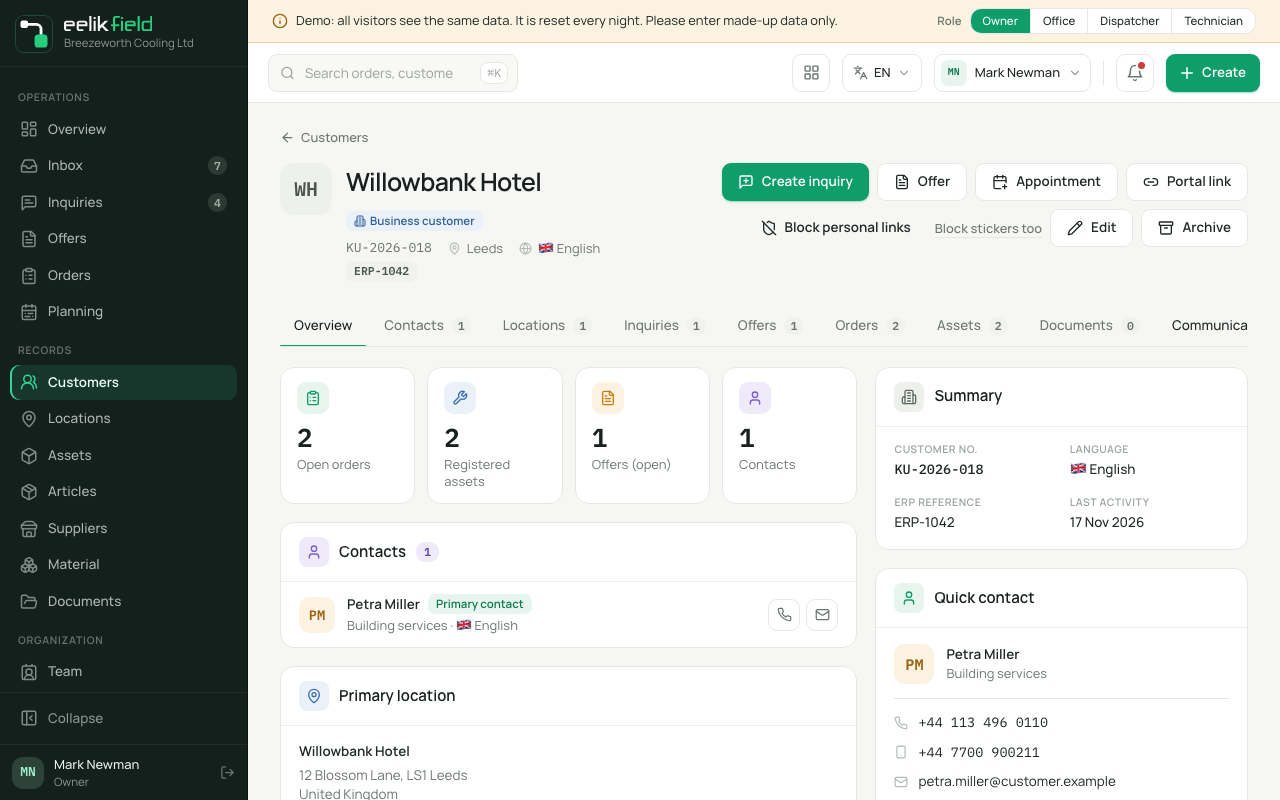
- Under “Customers”, open the customer.
- Click “Portal link” at the top.
- eelikField creates the link, if there is none yet, and copies it to the clipboard. The button briefly shows “Portal link copied”.
- Next to it, “open” appears. With it you see what the customer sees.
- Paste the link into an email or message to the customer.
If you click again later, you get the same link as long as it is valid. No second one is created.
What the customer sees and does
Section titled “What the customer sees and does”The overview
Section titled “The overview”The customer sees “Welcome back” and four areas:
- “Your offers”: Open offers with “Waiting for you” and “Valid until”. With “View offer” they open the offer.
- “Your orders”: Orders in progress. With “Track order” they see the status.
- “Your appointments”: Upcoming appointments. With “View appointment” they open an appointment.
- “Your devices”: Their devices with “Next service”. With “Open service book” they see the page of the device.
Below are “Your contact” (with “Call” and “Email”), the quick actions “Request service” and “Send message” and the history of the “Messages”.
If something does not exist, you see for example “No open offers right now.” or “No appointment scheduled.”
Accepting or declining an offer
Section titled “Accepting or declining an offer”On the page of the offer, the customer sees “Services”, the “Optional services” (to tick), the amounts, the “Terms” and “Attachments”. They have three buttons:
- “Ask a question”: A message to you (“Question about the offer”). It arrives in the inbox under “Customers”.
- “Decline”: The customer can give a reason (“Reason or feedback …”, voluntary). The offer becomes “Declined”.
- “Accept”: “Confirm offer digitally” opens. The customer writes their name, ticks “I accept offer … at the stated price and confirm the terms.” and clicks “Confirm digitally”. They can optionally add a message, for example a preferred date. The page says: “Your confirmation is binding and is logged.”
What happens on your side when the customer accepts: The offer gets the status “Accepted”. eelikField creates an order by itself with the status “Unplanned” and sends the customer the order confirmation as a PDF. The order is in your list and on the planning board under “Unplanned orders”. The customer sees “Thank you! Your offer is accepted.” and “What happens next”. If they accept twice, only one order is created anyway.
Expired and declined offers can no longer be accepted.
Tracking an order
Section titled “Tracking an order”The page “Order tracking” shows the progress in steps: “Inquiry received”, “Preparing your offer”, “Appointment arranged”, “Preparing materials”, “Execution scheduled”, “Work in progress”, “Work completed”. In addition there are:
- “Details” with the service, “Scheduled date”, address and “Your technician”,
- the “Service time” (Travel, Work, Break, Total),
- “Photos from the visit” that the technician shared for the customer,
- the “Installed device” with “Warranty” and “Next service”,
- the “Documents”, including the work report,
- “Send message” to the contact person.
After completion it says: “Order completed: Thank you for your trust. Here are all the documents for this order.”
The customer only sees what is released for them. They do not see internal files and team notes. You release a file on the order with “Make customer-visible”.
Viewing an appointment and asking for a change
Section titled “Viewing an appointment and asking for a change”On the appointment page, the customer sees “Date”, “Time window”, “Address”, “Purpose” and “Your technician”, plus a fixed note about preparation and “Show route”. They can:
- “Request a new time”: They suggest two to three preferred time slots and give a reason. The existing appointment stays valid until you confirm a new one. The request reaches you as a message. You create the new appointment yourself on the planning board (see Planning board).
- “Add access information”: They enter “Entrance / doorbell”, “Parking” and “Additional notes”. The technician sees this before the appointment.
- “Send message” or “Call”.
Requesting service
Section titled “Requesting service”With “Request service”, the customer reports a concern: “Regular maintenance”, “Fault / problem” or “Inspection / advice”, if wished with “Device” and “Description”. An inquiry with the source “Portal” is created on your side. For “Fault / problem” it has the priority High, otherwise Medium. The notification “New service request” alerts you. The customer gets “Request sent” and the promise of a suggested appointment. You find the inquiry under “Inquiries” (see Inquiries).
Writing messages
Section titled “Writing messages”Everywhere in the portal, the customer can “Send message”. The message is in the inbox under “Customers”, and your reply “To the customer” appears in the portal again (see Messages). The customer can also send photos and PDFs along (photos JPG and PNG as well as PDF, up to 15 MB).
The service book
Section titled “The service book”The page “Device & service book” shows “Device information” (device, location, room, installation date, warranty until, serial number, maintenance interval), the “Service history” with maintenance and installations carried out, “Documents” and “Device photos”. With “Request service” the customer asks for an appointment. If the warranty only continues with regular maintenance, it says there: “Service needed to keep your warranty valid”.
The PIN for the QR stickers
Section titled “The PIN for the QR stickers”The stickers hang in the customer’s house, and anyone standing in front of them could scan them. That is why the service reports are protected behind a four-digit PIN. Through the customer’s personal link, they need no PIN.
The PIN applies to all devices of a customer. You manage it on the customer page in the card “PIN for QR stickers”:
| Button | Effect |
|---|---|
| “Show PIN” and “Hide” | Shows the PIN so you can pass it on to the customer. |
| “New random PIN” | Issues a new random PIN. The old one no longer works. Anyone who opened the reports with the old PIN enters the new one. A confirmation question follows. |
| “Set PIN yourself” | You set four digits yourself (“New PIN (4 digits)”), with “Save PIN”. “The random PIN is the safest choice.” |
PINs that are too easy are not allowed: four equal digits, runs of digits (1234, 9876), years (1985, 2024), patterns (1212, 1122) and key runs on the number pad (2580). You then see “This PIN is too easy to guess.”
If someone enters the PIN wrongly several times, the portal blocks the entry. The customer sees “Too many wrong entries. You can try again from …. Or give us a call.” If there are very many wrong entries at a customer’s stickers, you see: “Today there were very many wrong PIN entries at this customer’s stickers. PIN entry is locked until …. A new PIN lifts the lock.”
Blocking links
Section titled “Blocking links”If a link has fallen into the wrong hands, for example through a forwarded email or a shared screenshot, you block it. On the customer page there are two buttons:
“Block personal links” (the normal case):
- All personal links of the customer then stop working: the overview and the links to orders, appointments and offers.
- The QR stickers on the devices stay valid. Nothing has to be reprinted.
- Every remembered PIN unlock ends. The PIN itself stays the same and has to be entered once again at the sticker.
- Afterwards you give the customer a new “Portal link”. Through it they also reach open offers again.
“Block stickers too” (only in an exceptional case):
- In addition, everything above applies, and the QR stickers on this customer’s devices no longer work. They have to be reprinted and stuck on again. The window gives the number of devices affected.
- Usually “Block personal links” is enough.
Both buttons ask for confirmation first. Afterwards you see “Blocked”.
Privacy
Section titled “Privacy”If you entered the address of your privacy policy under “Settings”, the footer of the portal and the PIN page carry a link “Privacy”. Only addresses that begin with https:// are allowed. The portal shows the location of the signature only if you allow this (see Work report).
Good to know
Section titled “Good to know”- The portal is not a customer account. Whoever has the link sees what the link shows. So give it only to the customer.
- There are no invoices and payments in the portal.
- In the portal, the customer can only do what is described above. They cannot delete anything and cannot change any master data.
Frequently asked questions
Section titled “Frequently asked questions”The customer says the link no longer works. Personal links expire after 180 days without use, or you have blocked them. Create a new one with “Portal link”.
How does the customer get to their service book? Through the QR sticker on the device (with a PIN for the reports) or through “Open service book” in their overview.
Can the customer move an appointment themselves? No. They can ask for a change. You confirm the new appointment.
Can I see what the customer sees? Yes. After “Portal link”, click “open”.